


Joining a Zoom meeting from home, a coffee shop, or a shared space often means your background is not exactly ideal. You might have laundry in the corner, books piled on a desk, or simply too many distractions behind you.
In professional settings, small background details can shift focus away from your message. To solve this, Zoom added the blur background feature. With just a few clicks, you can hide your environment and keep the focus squarely on you.
This article explains how to blur the background on Zoom across the Zoom desktop app and the Zoom mobile app. You will learn how to set blur before or during a meeting, how it compares to using the virtual background feature, what to do if the option is missing, and how to get the best results.
Quick answer (TL;DR)
If you only need the basics, here is a summary:
- Before a meeting on desktop or mobile: open Zoom, go to Settings, select Background & Effects, and click Blur.
- During a meeting on desktop: in the video window, use the arrow next to the video icon, go to Background & Effects, and select Blur.
- During a meeting on mobile: tap More, choose Backgrounds, and then tap Blur.
Why use background blur in Zoom?
The option to blur your background may seem like a small convenience, but it actually plays an important role in how you come across during calls. In a professional setting, people want to focus on what you are saying, not on what is sitting on the shelf behind you.
Privacy is one of the main reasons to enable the blur background feature. If you are working from home, you may not always want colleagues or clients to see your personal space. A blurred background hides the details without requiring you to tidy every corner before each call. In some cases, it also protects sensitive information, such as documents pinned to a wall or items that could accidentally appear in the frame.
Another advantage of blur is maintaining focus. Even something as small as a mirror or a window in the background can catch attention and pull eyes away from you. The blur feature solves this problem instantly.
It is also faster than choosing or uploading an image for the virtual background feature. With blur, you don’t need to worry about green screens, filters, or uploading the right file format. It simply softens your real environment while keeping you visible.
Make the most out of Zoom with MeetGeek
Changing your background in Zoom can help you look more polished, but improving your meeting outcomes requires more. That’s where MeetGeek comes in. It captures and transcribes your Zoom calls automatically, creating searchable records you can review whenever you need.
Within minutes of a call, you receive a summary with the key points, decisions, and action items neatly highlighted. This means you no longer need to take notes while speaking, and you can share insights with your team without extra work.
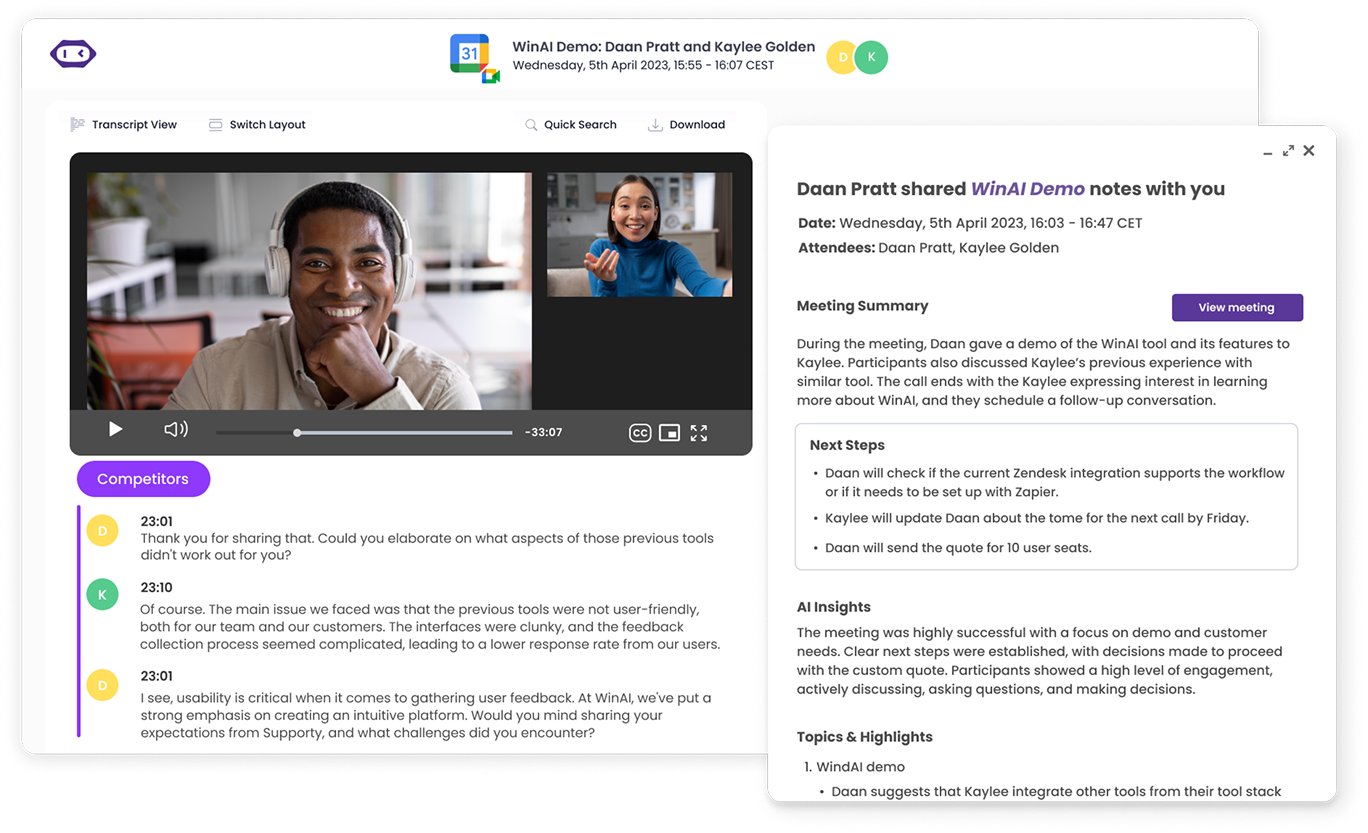
The platform offers both flexibility and privacy. With the Chrome extension, you can record directly in your browser without showing an extra participant marked with a Zoom logo in the call.
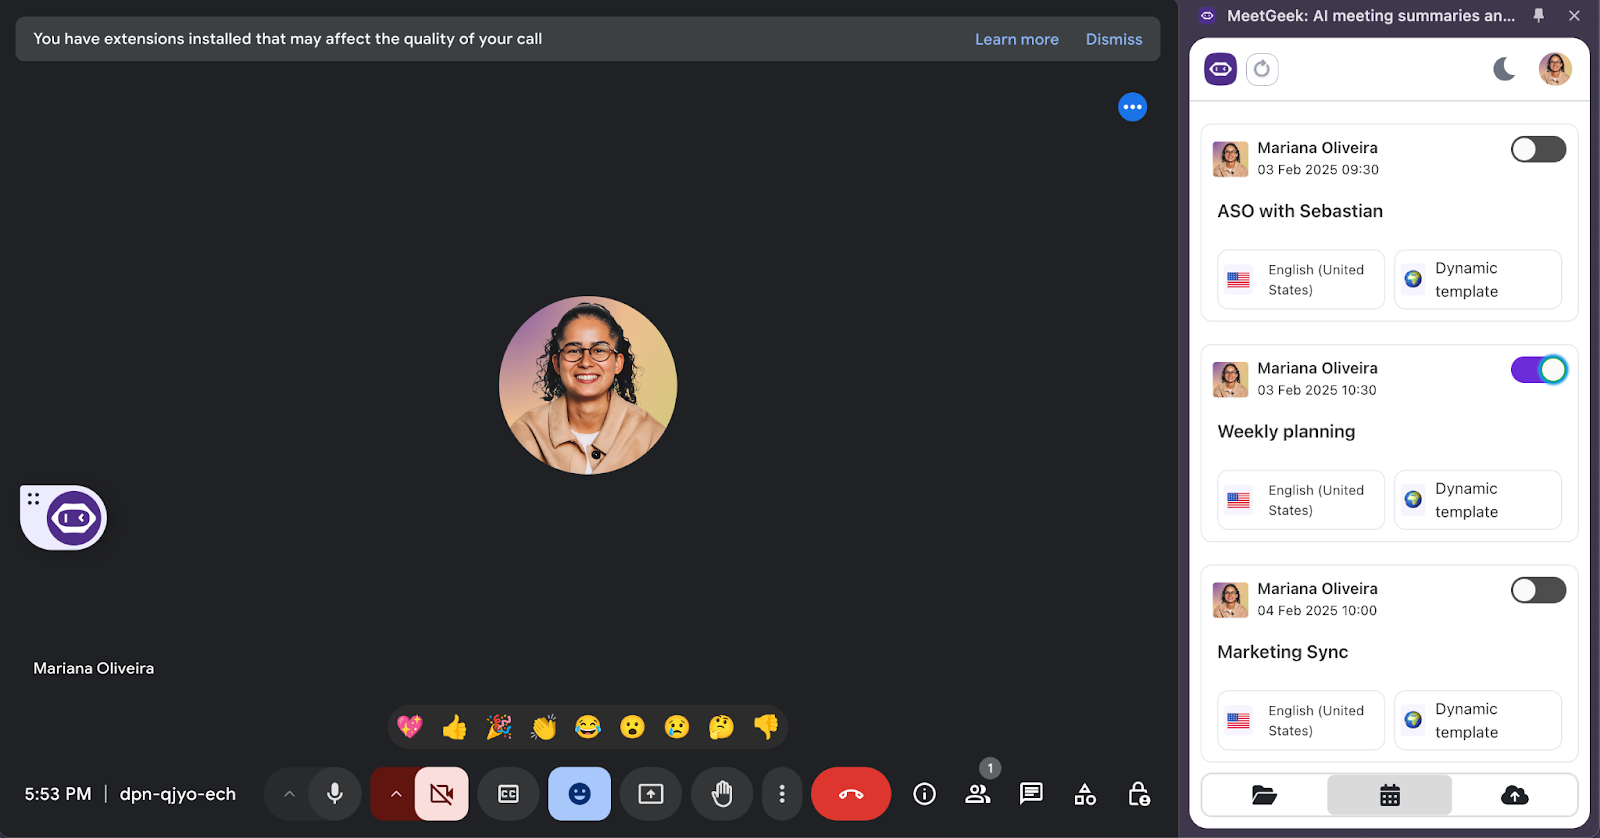
All your meeting transcripts are stored in one place, covering not only Zoom but also Microsoft Teams, Google Meet, Webex, and Discord. You can even ask questions afterward, such as “What did we decide about the timeline?” and find the answer instantly in your transcript.

By integrating with Slack, Notion, Trello, and other tools, MeetGeek makes sure your meeting insights move directly into your workflow. So while the blur background option improves how you appear on screen, MeetGeek ensures you also capture and share what matters most from every conversation.
How to blur the background in Zoom before a meeting
Enabling blur before you join ensures you look polished from the start.
On the desktop app
- Open Zoom and sign in.
- In the top right, click your profile picture.
- Access your Settings.
- Select Video & effects or the Virtual backgrounds tab.
- Find the blur option and click Blur.
- Close the window and join your meeting.
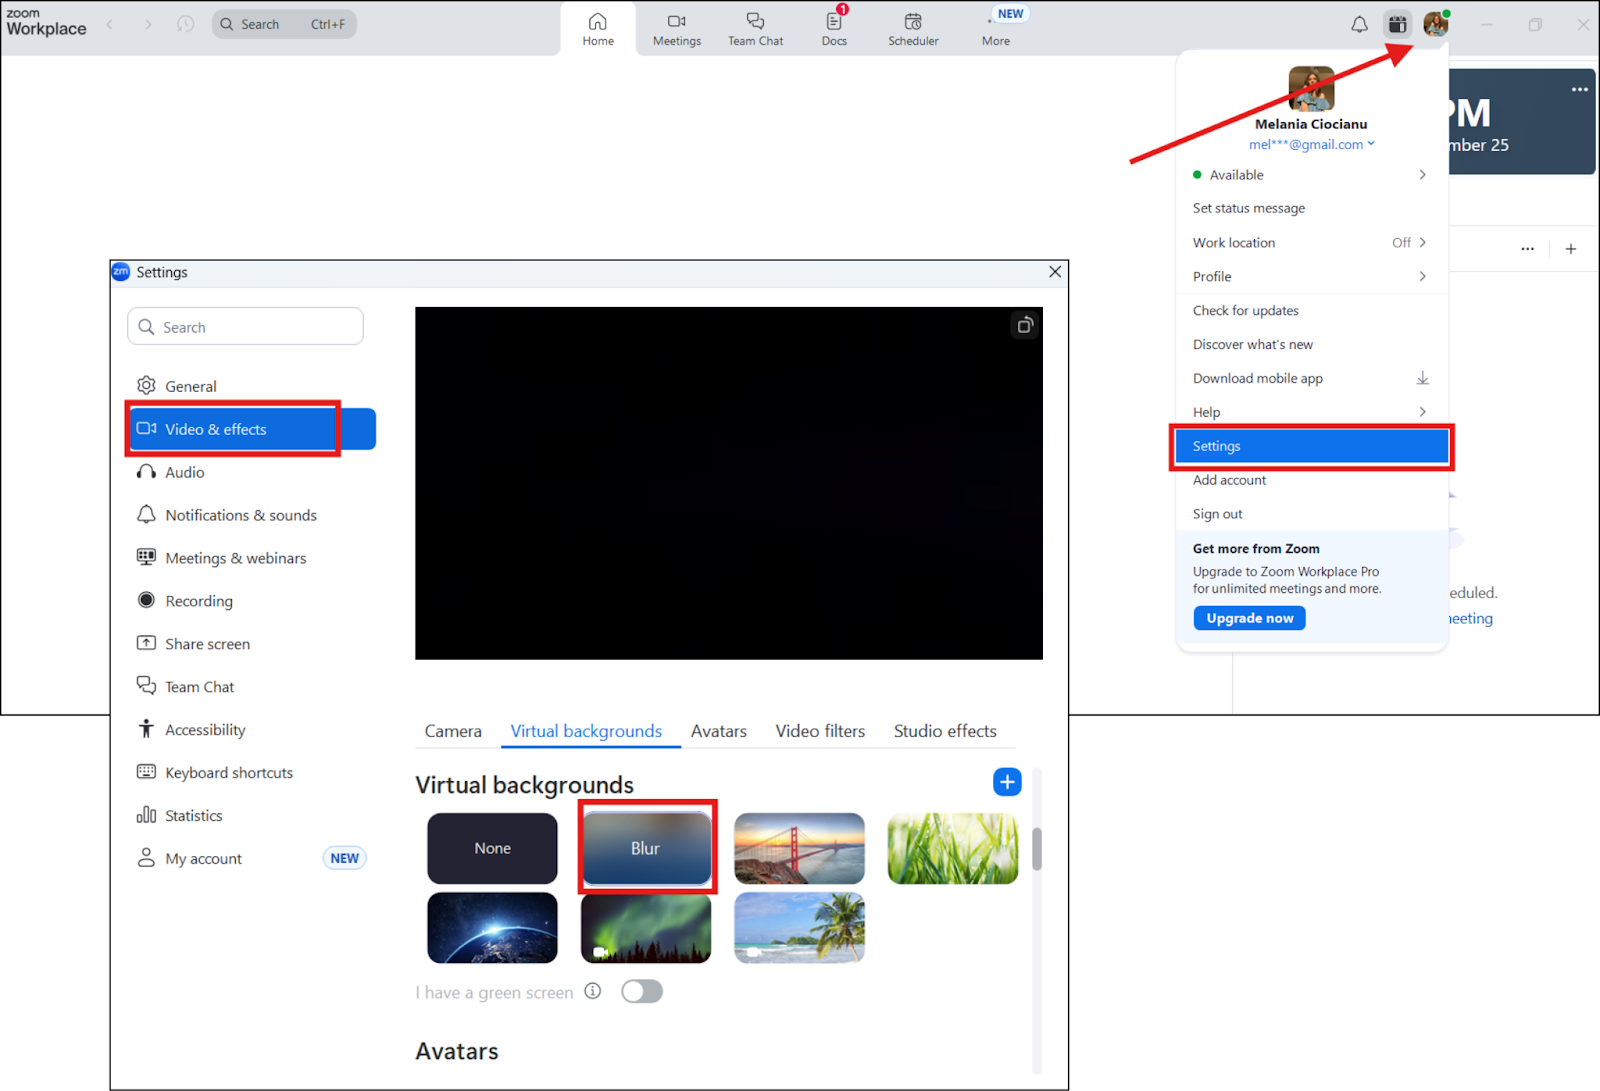
You can also simply blur the background right before joining the meeting, from the bottom right of your screen. Tap Backgrounds and select Blur.
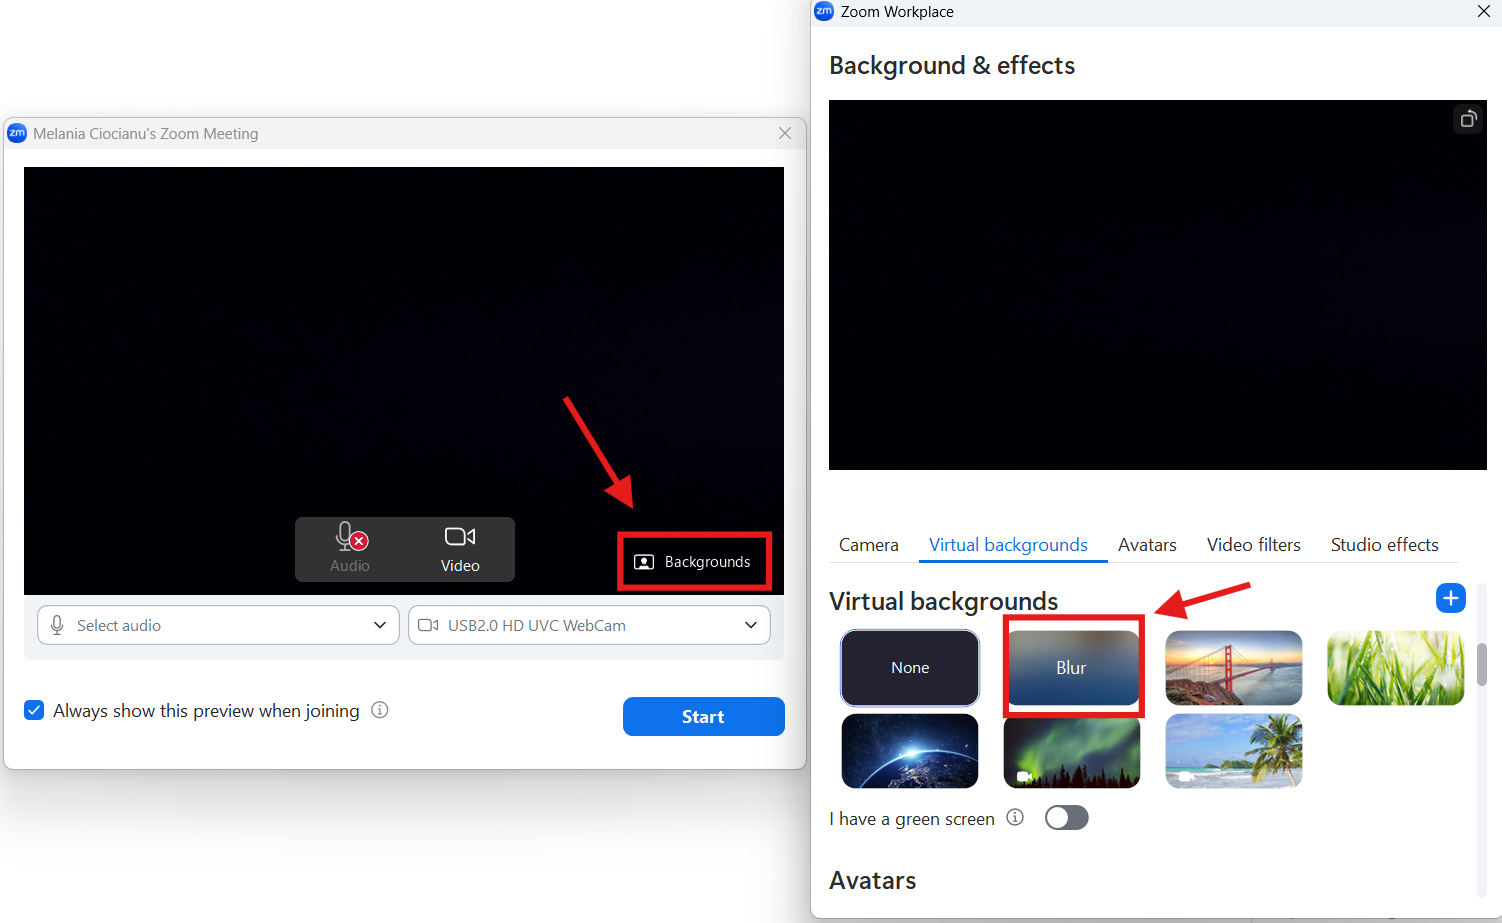
Tip: Make sure you’re on the latest version of the Zoom desktop app. Older versions or devices that don’t meet hardware requirements may not support virtual backgrounds or blur.
On the Zoom mobile app
- Open the Zoom app on your iPhone or Android device.
- Tap your profile picture.
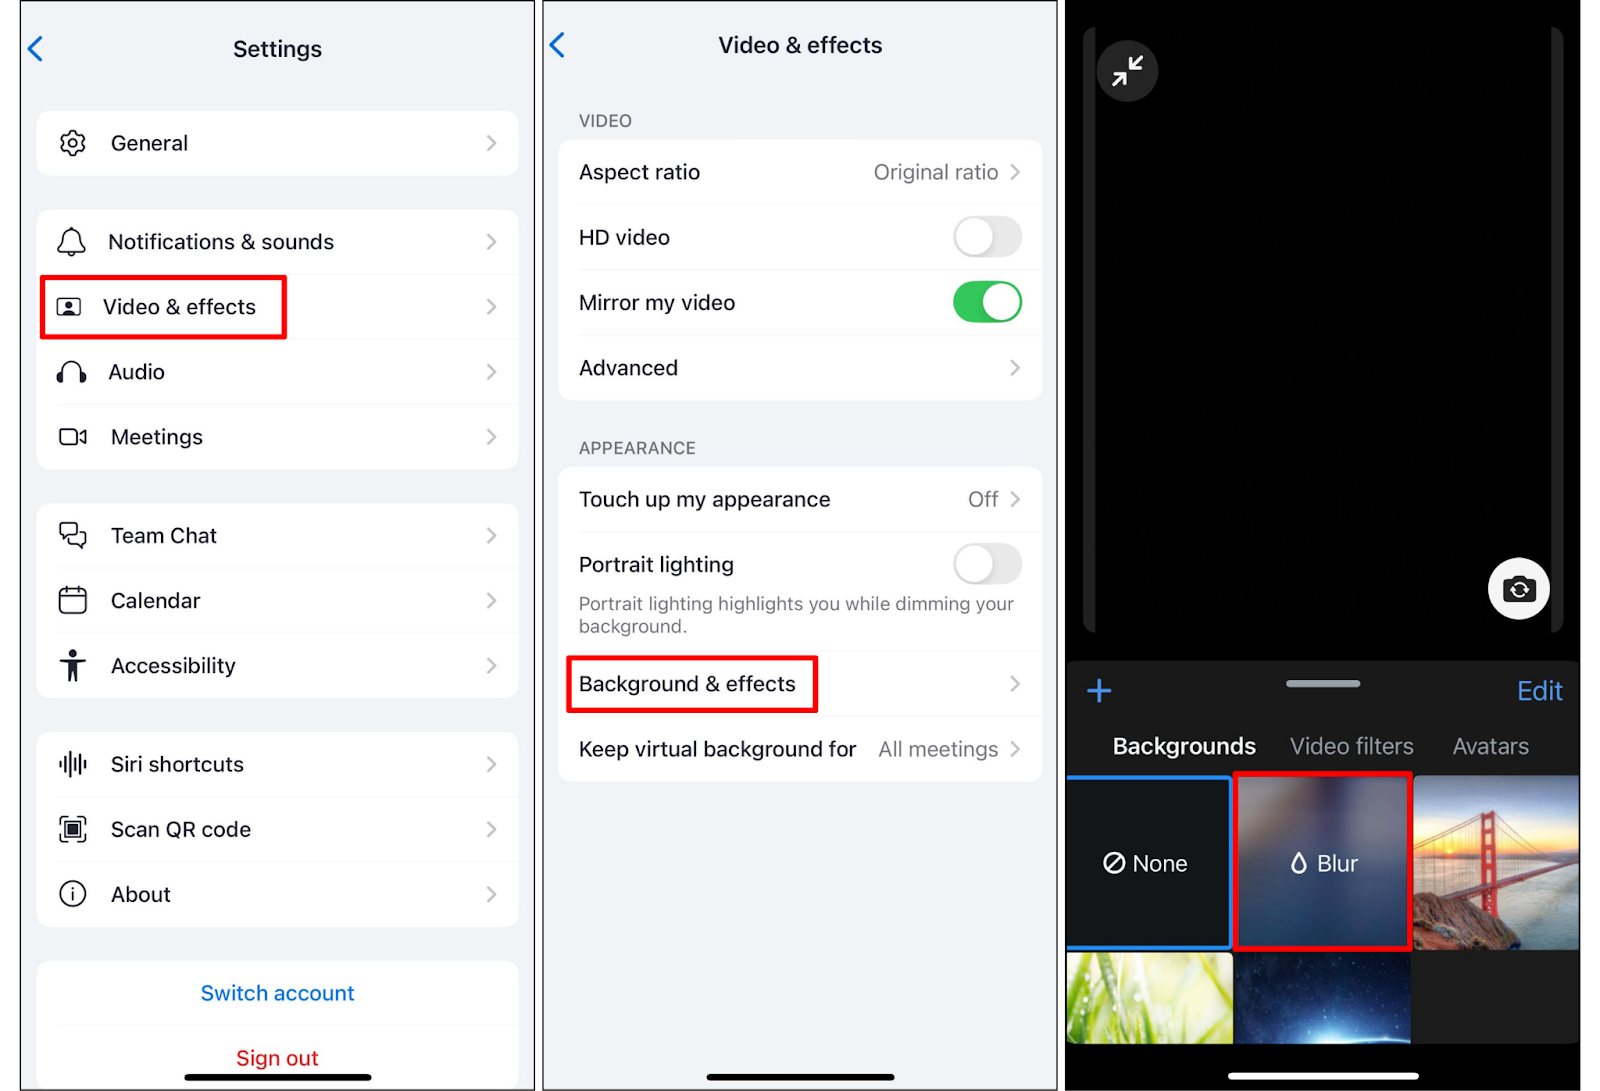
- Go to Settings → Video & effects.
- Tap Backgrounds & effects.
- Tap Blur and then the minimize icon to return.
How to blur your background in Zoom during a meeting
If you’ve already joined a Zoom meeting, you can still change your background without leaving.
On the desktop app
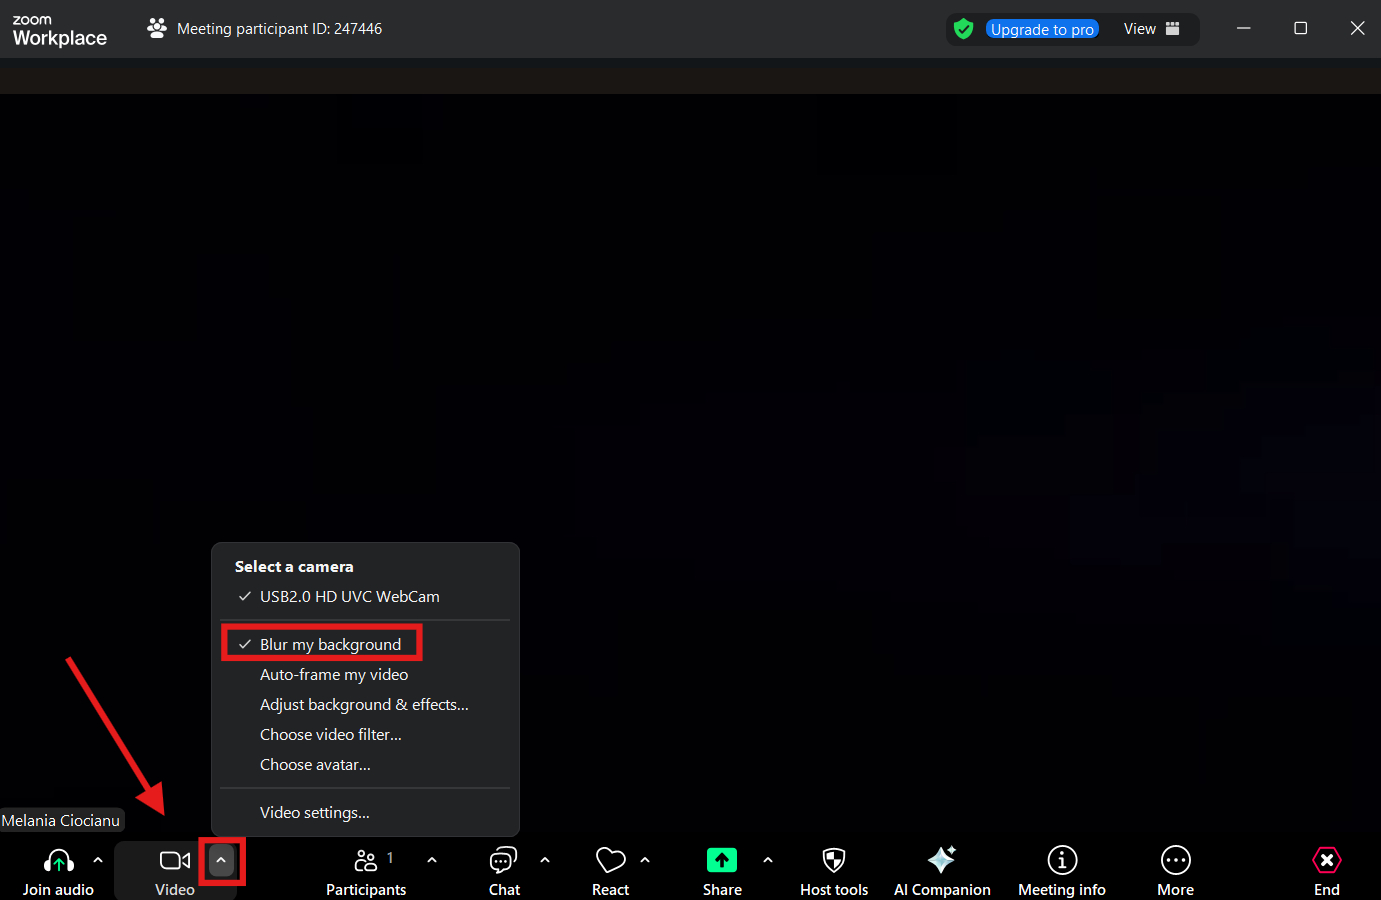
- In the bottom left corner of the video window, click the arrow next to the video icon.
- Select Video settings or Choose virtual background.
- Select Blur.
On the Zoom mobile app
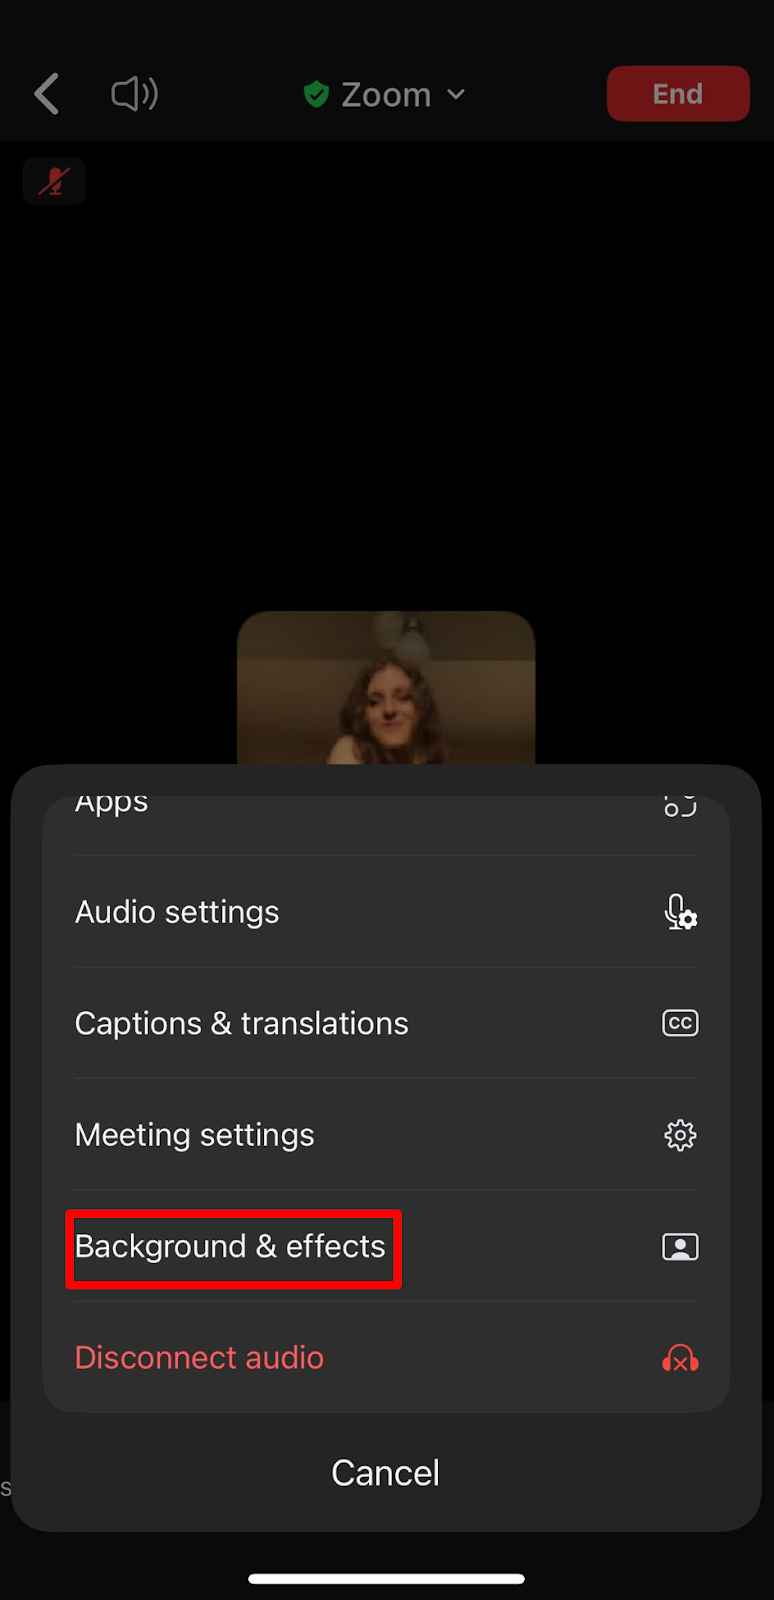
- Tap More in the bottom right corner.
- Tap Backgrounds.
- Tap Blur.
The blur my background effect will stay active until you turn it off.
Zoom background blur vs virtual background
Both the blur and virtual background features enhance how you appear on screen, but they work differently. Choosing the blur option gently softens your actual surroundings. It’s a quick, subtle adjustment that puts less demand on your computer or mobile device. The virtual background option replaces your environment with an image or video. You can even upload a file to customize it.
Blur is best for everyday meetings where professionalism and simplicity matter. Virtual backgrounds are ideal if you want to showcase branding, hide your location completely, or add some creativity. However, the virtual background feature works best with strong lighting, updated software, and sometimes a green screen.
Think of blur as a quick, practical solution and virtual backgrounds as a way to personalize your presence.
Troubleshooting background blur
If the blur background option doesn’t appear:
- Update Zoom: Make sure you’re running the latest version of the app.
- Check device compatibility: Older laptops or Intel processors may not meet the hardware requirements.
- Improve lighting: Poor lighting can cause parts of you to also be blurry or look distracting.
- Restart the app: Fully close and reopen the Zoom desktop app or Zoom mobile app.
- Reinstall if needed: If the blur option is still missing, reinstall Zoom from the official site.
Best practices for using blur for your Zoom background
Using the blur background feature instantly improves how you appear in a Zoom meeting, but a few extra steps can help you get the best results. Here are some best practices to follow.
1. Test the blur effect before an important meeting
Before joining a call with clients or colleagues, open the video settings in your Zoom desktop app or join a test meeting to see how the blur effect looks. This allows you to check whether your face is in focus and your background in Zoom is properly softened. Making adjustments in advance prevents any surprises once you are live in front of others.
2. Improve your lighting for better clarity
The blur feature works by separating you from the background. Without good lighting, parts of your face or clothes may appear blurred too. Aim for natural light from a window or position a lamp in front of you. Avoid strong light coming from behind, as this can cast shadows and confuse the effect.
3. Wear solid colors for sharper results
Busy patterns, stripes, or reflective fabrics can interfere with the blur background option. Wearing solid, contrasting colors makes it easier for Zoom to distinguish you from your surroundings. This small change can noticeably improve how professional you look on camera.
4. Keep your camera lens clean
A dirty or smudged lens can reduce the sharpness of your video, making the blur feature less effective. Wipe your camera lens regularly with a soft, dry cloth to ensure your image remains clear and focused. This is especially important on mobile devices, which often collect dust or fingerprints.
5. Know when to switch to a virtual background
The blur effect is great for hiding small distractions, but it has its limits. If you need to display branding, maintain full privacy, or create a polished presentation, consider using the virtual background feature instead. You can upload an image or even a video file from your computer, or use a green screen for the best results. This allows you to customize your background in Zoom while keeping attention on you.
How to get started with MeetGeek + Zoom
Blurring your background is about looking professional. MeetGeek is about making your meetings productive. Getting started takes just a few steps:
- Create a free MeetGeek account.
- Link your Google or Outlook Calendar.
- Select the meetings you’d like recorded and transcribed, or use the Chrome extension to capture calls directly from your browser.
- Once the meeting ends, you’ll get an email with the transcript, key highlights, and a clear summary.
With MeetGeek, every Zoom meeting becomes a searchable, shareable resource.
Zoom is better with MeetGeek
Learning how to blur the background on Zoom gives you a simple way to appear more polished and reduce distractions, whether you’re using the desktop app or the Zoom mobile app. It’s a quick adjustment that protects your privacy and helps others stay focused on what you’re saying.
But looking professional on screen is only half the story. To make meetings truly effective, you also need a way to capture key points, decisions, and follow-ups without relying on memory. That’s where MeetGeek comes in. By recording, transcribing, and summarizing your Zoom meetings, MeetGeek turns every conversation into a reliable resource you can revisit and share.
Try MeetGeek for free today and see how much more value you can get out of your Zoom calls.
Frequently asked questions
Why can’t I see the blur background option?
If you can’t see the blur background option, you may need to update Zoom or check your hardware requirements.
Does blur lower video quality?
No, blurring your background won’t lower your video quality; it only adjusts the background while keeping your video clear.
Can I use blur on mobile?
Yes, both the Zoom mobile app for iOS and Android support it.
Do I need a green screen?
No, the blur option on Zoom works without a green screen.
Can I upload an image instead?
Yes, if you don't want your background visible at all, in the virtual backgrounds tab you can upload an image or video file.






.avif)