Cómo organizar una reunión de Teams: una guía paso a paso para principiantes
Aprenda a organizar una reunión de Teams sin esfuerzo con nuestra guía para principiantes. Desde programar hasta invitar, ¡cubrimos cada paso!
✅ Free meeting recording & transcription
💬 Automated sharing of insights to other tools.

En el mundo actual, la capacidad de conectarse y colaborar de manera fácil y eficaz es crucial, especialmente en el ámbito empresarial. Con más de 300 millones de usuarios, Microsoft Teams es la mejor opción para la comunicación en línea, ya que reúne a las personas sin importar dónde se encuentren.
Si tienes dificultades para organizar una reunión de Teams o simplemente eres nuevo en la plataforma, no te preocupes. Nuestra guía para principiantes está aquí para ayudarte a organizar y dirigir tus reuniones virtuales sin esfuerzo en esta plataforma.
Lo guiaremos en cada paso, desde la programación hasta la participación de sus participantes, para asegurarnos de que sus reuniones virtuales sean productivas y agradables. ¿Empezamos?
Las mejores funciones de Microsoft Teams para reuniones
Microsoft Teams combina poderosamente la comunicación y la colaboración, y ofrece funciones que satisfacen las necesidades del dinámico entorno de trabajo actual.
Estas son las mejores funciones de Microsoft Teams para reuniones:
- Llamadas de audio y vídeo: Teams ofrece llamadas de audio y vídeo nítidas, lo que facilita la comunicación tanto si hablas con miembros del equipo como con socios externos.
- Reuniones en línea: Puede programar reuniones directamente desde su calendario de Outlook, invitar a los asistentes con un simple correo electrónico e incluso iniciar reuniones espontáneas con la función «Reunirse ahora».
- Chat de reuniones y mensajería instantánea: El chat y la mensajería instantánea de Teams mantienen la conversación antes, durante y después de las reuniones. Esto permite a los participantes compartir ideas, hacer preguntas y dar su opinión sin interrumpir.
- Uso compartido de archivos: Puede subir archivos directamente al chat o compartir la pantalla para presentar documentos y hacer que las reuniones sean más atractivas y fructíferas.
- Espacio de trabajo colaborativo: Teams te permite crear, compartir y trabajar en documentos con otros miembros del equipo en tiempo real. Gracias a las integraciones con aplicaciones de Office como Word, Excel y PowerPoint, el trabajo en equipo puede realizarse sin problemas sin salir de la aplicación.
- Canales: Organice sin problemas las conversaciones por temas, proyectos o departamentos a través de canales dedicados para facilitar la búsqueda de información relevante.
- Integración con otras aplicaciones: Trae tus herramientas favoritas de gestión de proyectos, software CRM o aplicaciones de diseño a Teams para mantener todas tus herramientas esenciales en un solo lugar.
- Seguridad y cumplimiento legal: La autenticación multifactorial y el cifrado de extremo a extremo, junto con el cumplimiento de las normas mundiales, garantizan la seguridad de los datos de sus reuniones.
Cómo configurar tus primeras reuniones de Microsoft Teams
Para garantizar que cada reunión de equipos se convierta en una reunión exitosa, debes cubrir todas tus bases. ¡Sigue leyendo para descubrir cómo organizar una reunión de Microsoft Teams!
A. Cómo configurar una reunión de equipo en el escritorio
A continuación, se explica cómo configurar una reunión de Teams en un escritorio:
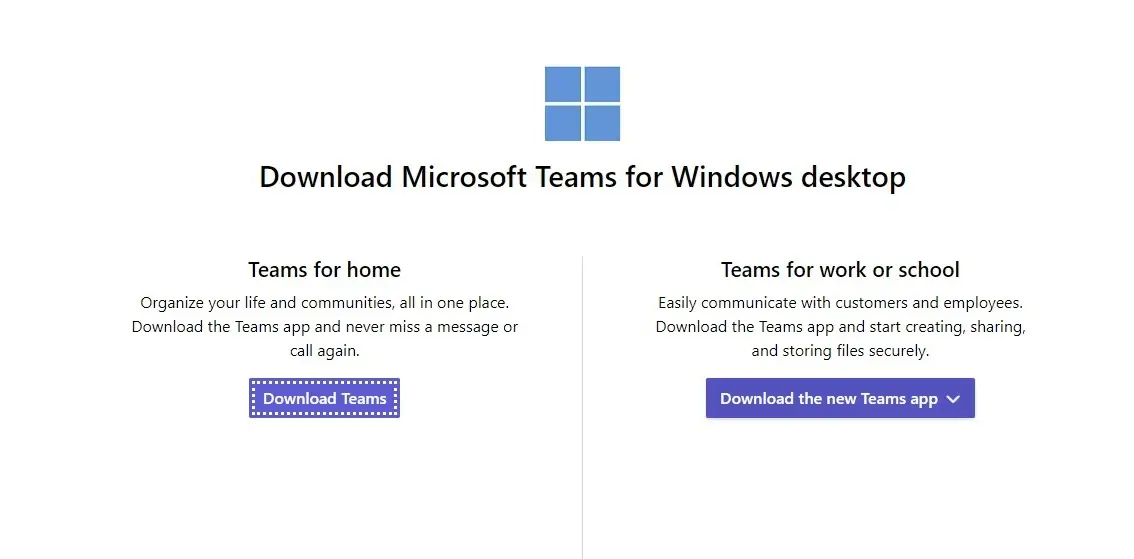
- Puede descargar fácilmente el Aplicación Microsoft Teams de Sitio web de Microsoft. Ejecútalo e inicia sesión con tu cuenta de organización.
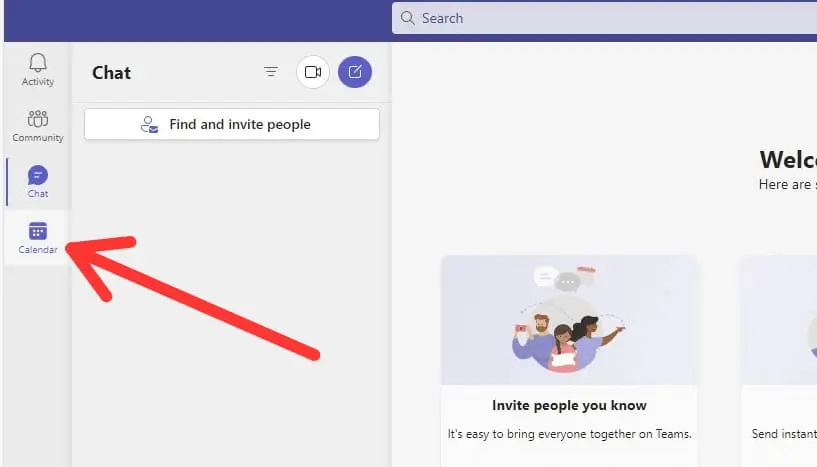
- En el menú de la izquierda, busca la opción 'Calendario' icono y selecciónelo. Aparecerá tu calendario de Teams, en el que se mostrarán tu agenda y las reuniones que ya hayas organizado o a las que hayas sido invitado.
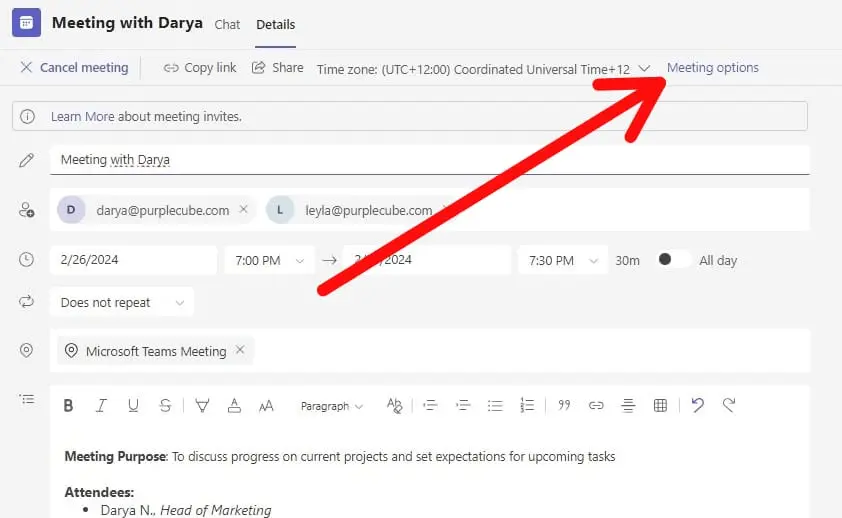
- En la vista de calendario, haga clic en el botón 'Nueva reunión' botón, que se encuentra en la esquina superior derecha de la aplicación. Esto abrirá el formulario de programación de reuniones.
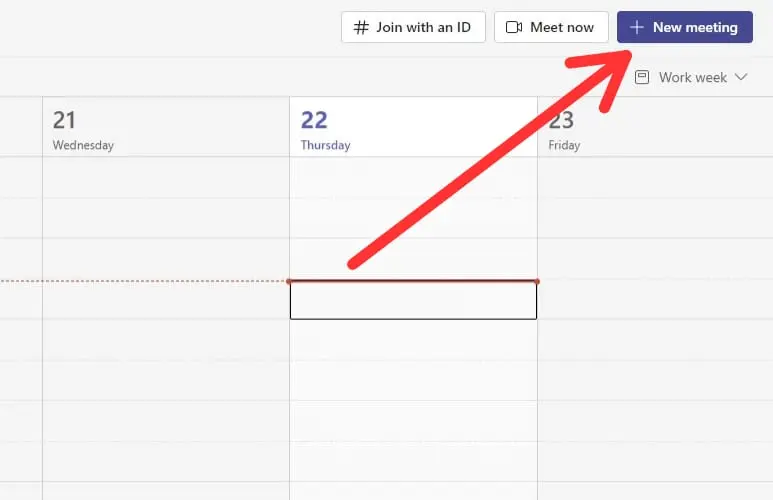
- En el 'Nueva reunión' formulario, tendrás que proporcionar detalles adicionales sobre tu reunión:
- Título: Elija un título conciso y descriptivo para la reunión.
- Fecha y hora: Seleccione las horas de inicio y finalización de la reunión.
- Asistentes: Invita a personas añadiendo sus nombres o direcciones de correo electrónico a la 'Añadir asistentes obligatorios' campo para participantes obligatorios, o 'Añadir asistentes opcionales' para aquellos a quienes deseas invitar pero no son obligatorios. A medida que escribas, Teams te sugerirá contactos de tu organización.
- Canal (opcional): Si quieres asociar la reunión a un canal de equipo específico, puedes seleccionar uno de los «Selecciona un canal para reunirte» menú desplegable. Esto hace que la reunión sea accesible para todos los miembros de ese canal.
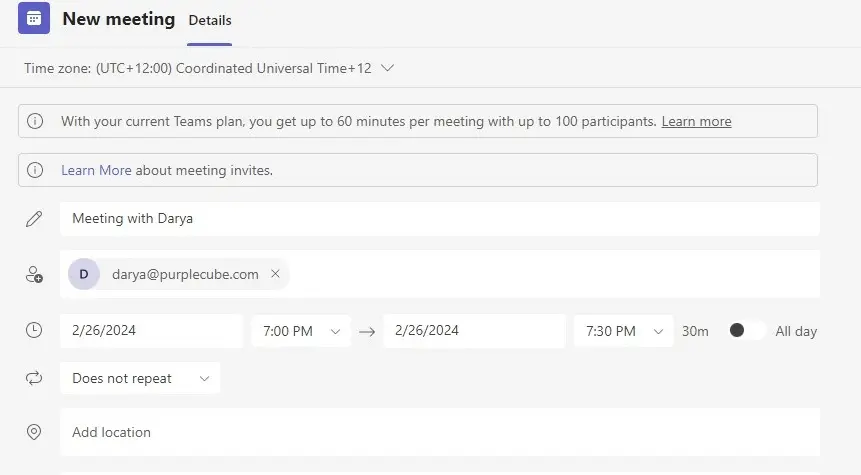
- Si va a ser una reunión periódica, haga clic en el botón 'No se repite» opción de configurar la reunión para que se repita diario, semanalmente, mensual, o en un intervalo personalizado.

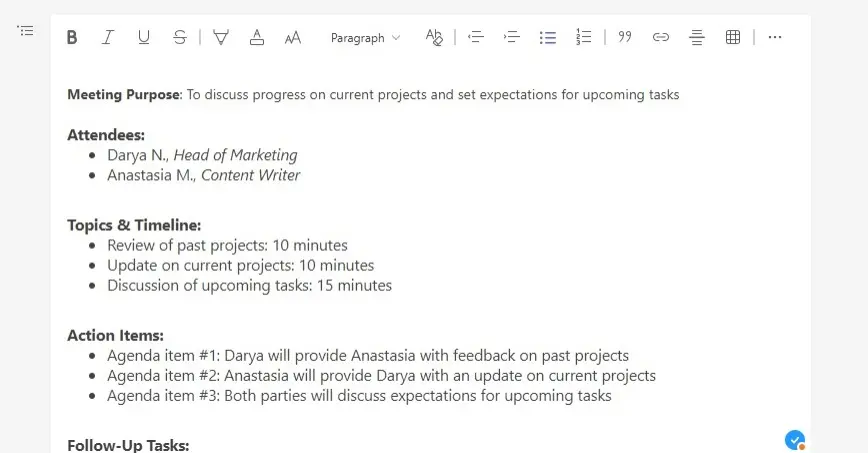
- Usa el 'Añadir descripción' casilla para introducir los detalles de la reunión o las instrucciones específicas para la reunión.
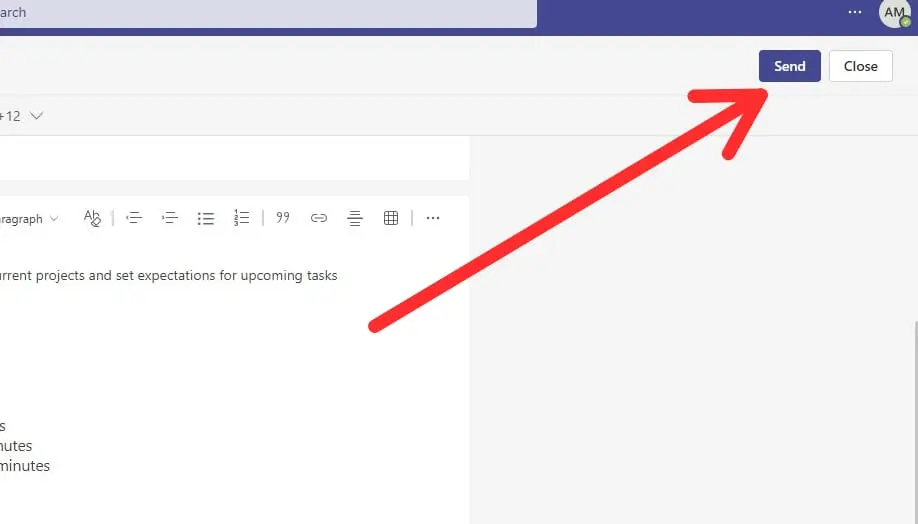
- Una vez que todos los detalles se hayan rellenado correctamente, haga clic en el botón 'Enviar» botón, que se encuentra en la parte superior derecha del formulario. Esto guardará la reunión en su calendario y enviará un invitación a la reunión a todos los participantes que hayas agregado.
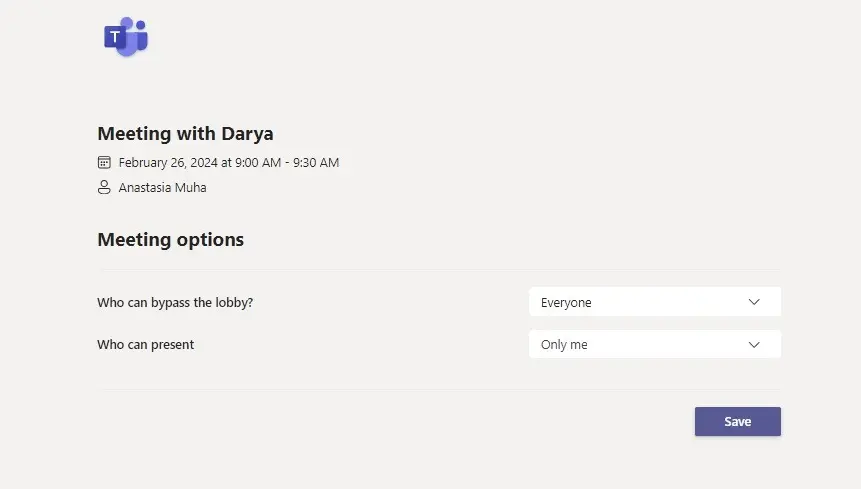
- Una vez guardada la reunión en su calendario, puede ir a 'Ajustar las opciones de la reunión' para más acciones, como quién puede saltarse la sala de espera o si los asistentes pueden hacer una presentación.
B. Cómo organizar una reunión de equipo en dispositivos móviles
A continuación, se explica cómo configurar una reunión de Teams en un dispositivo móvil:
- Abra el Aplicación Microsoft Teams en tu dispositivo móvil. Si aún no lo has hecho, descárgalo de Google Play Store (para dispositivos Android) o App Store (para dispositivos iOS) e inicia sesión con tus credenciales.
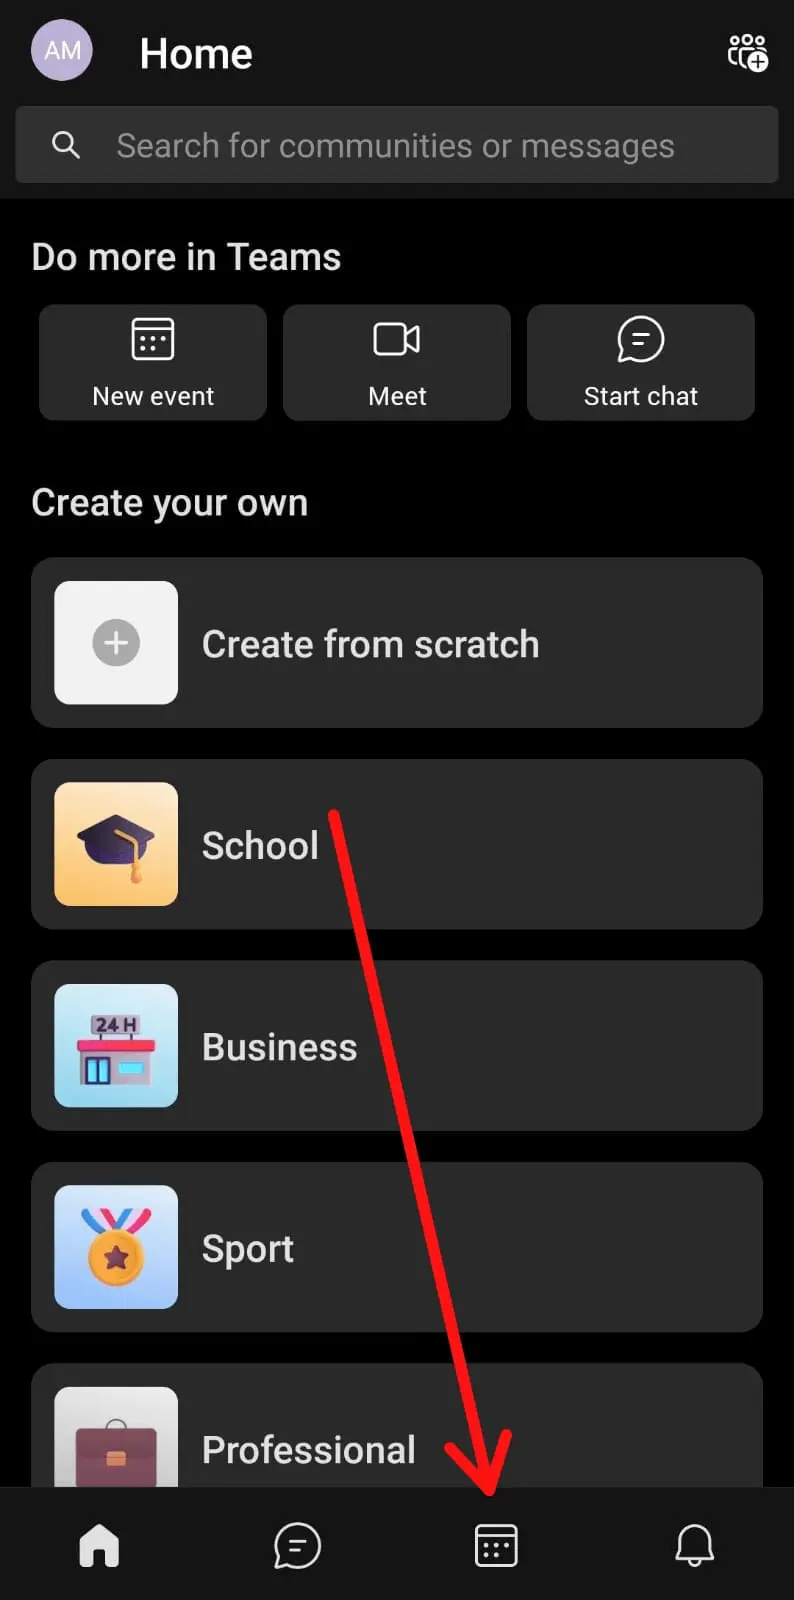
- Una vez en la aplicación, toca el botón 'Calendario' icono ubicado en la parte inferior de la pantalla para acceder al calendario de Teams.
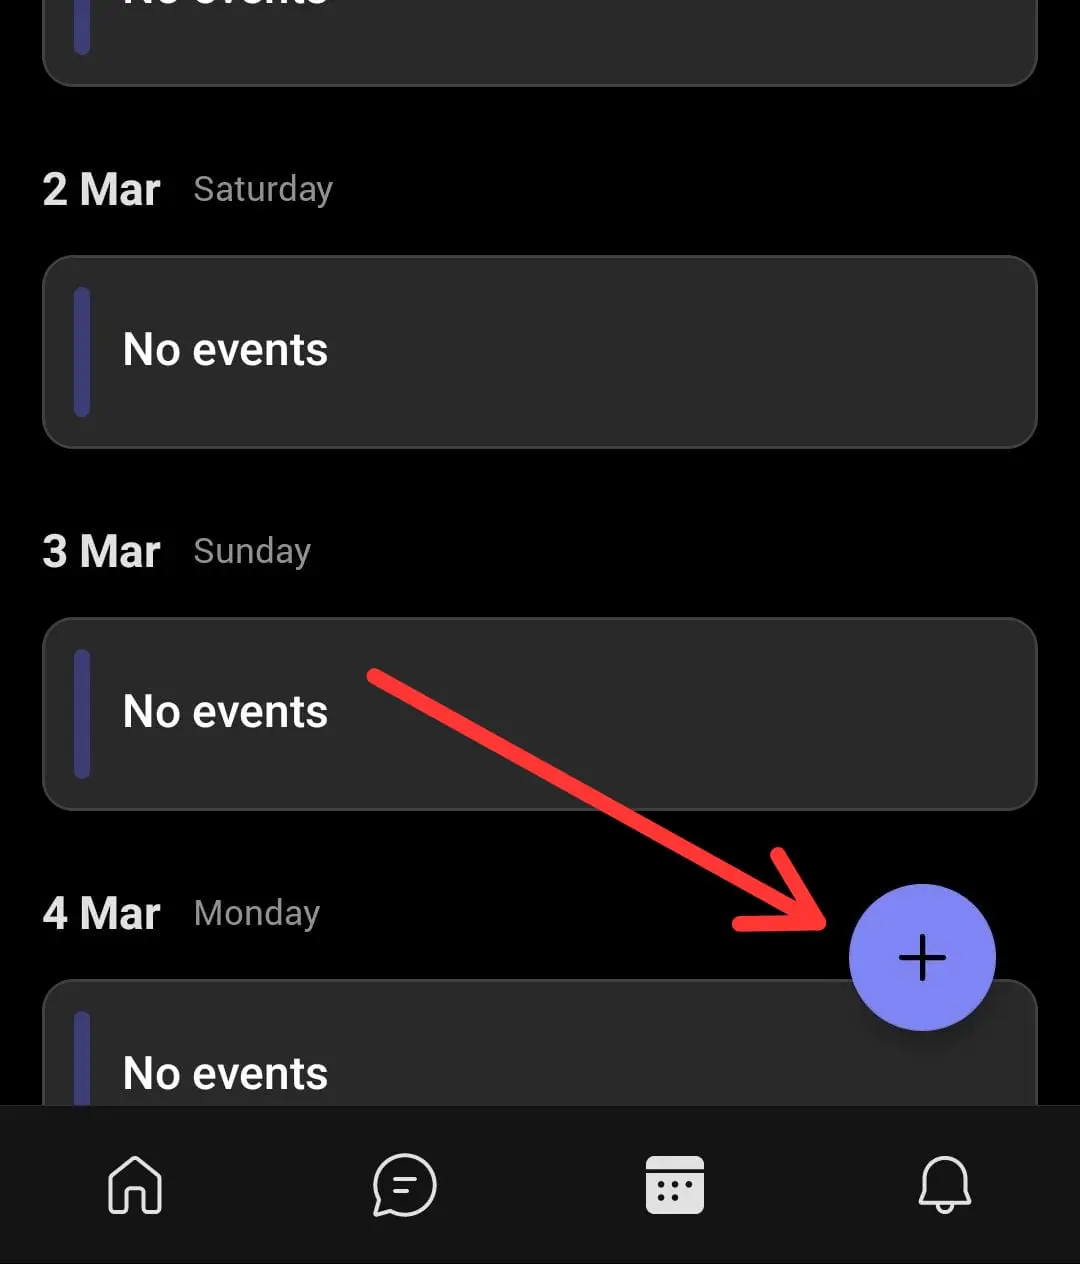
- En la esquina superior derecha de la pantalla, busca y selecciona el Botón «Nueva reunión» (+) para empezar a crear y personalizar una nueva reunión.
- Se le pedirá que vaya al «Nueva reunión» pantalla, donde puede introducir todos los detalles necesarios para la reunión:
- Título: asigne a la reunión un título claro y descriptivo.
- Hora de inicio y finalización: Elija la fecha y la hora de la reunión y ajuste la duración según sea necesario.
- Asistentes: Seleccione a los participantes añadiendo sus nombres o direcciones de correo electrónico al 'asistentes' campo. Los equipos sugerirán contactos a medida que escribas. Puedes añadir personas como requerido o como opcional asistentes.
- Canal (opcional): Si la reunión está vinculada a un equipo o proyecto específico, también puede seleccionar un canal del equipo de la clase para asociarlo a la reunión. De este modo, la reunión será visible para todos los miembros del canal.

- Si esta reunión se llevará a cabo con regularidad, toque la opción de repetición para configurarla como diario, semanalmente, o personalizado reunión recurrente.
- Usa el 'Agregar detalles' sección para incluir la agenda de la reunión, objetivos o cualquier material preleído.
- Una vez que hayas rellenado toda la información necesaria, busca el «Hecho» o 'Ahorrar' botón en la esquina superior derecha de la pantalla. Tóquelo para guardar la reunión. Las invitaciones se enviarán automáticamente a todos los asistentes que haya agregado.
- Cuando termine, es posible que desee ajustar ajustes adicionales, como si desea que la reunión sea una videollamada y si va a permitir que los asistentes se unan antes que el anfitrión.
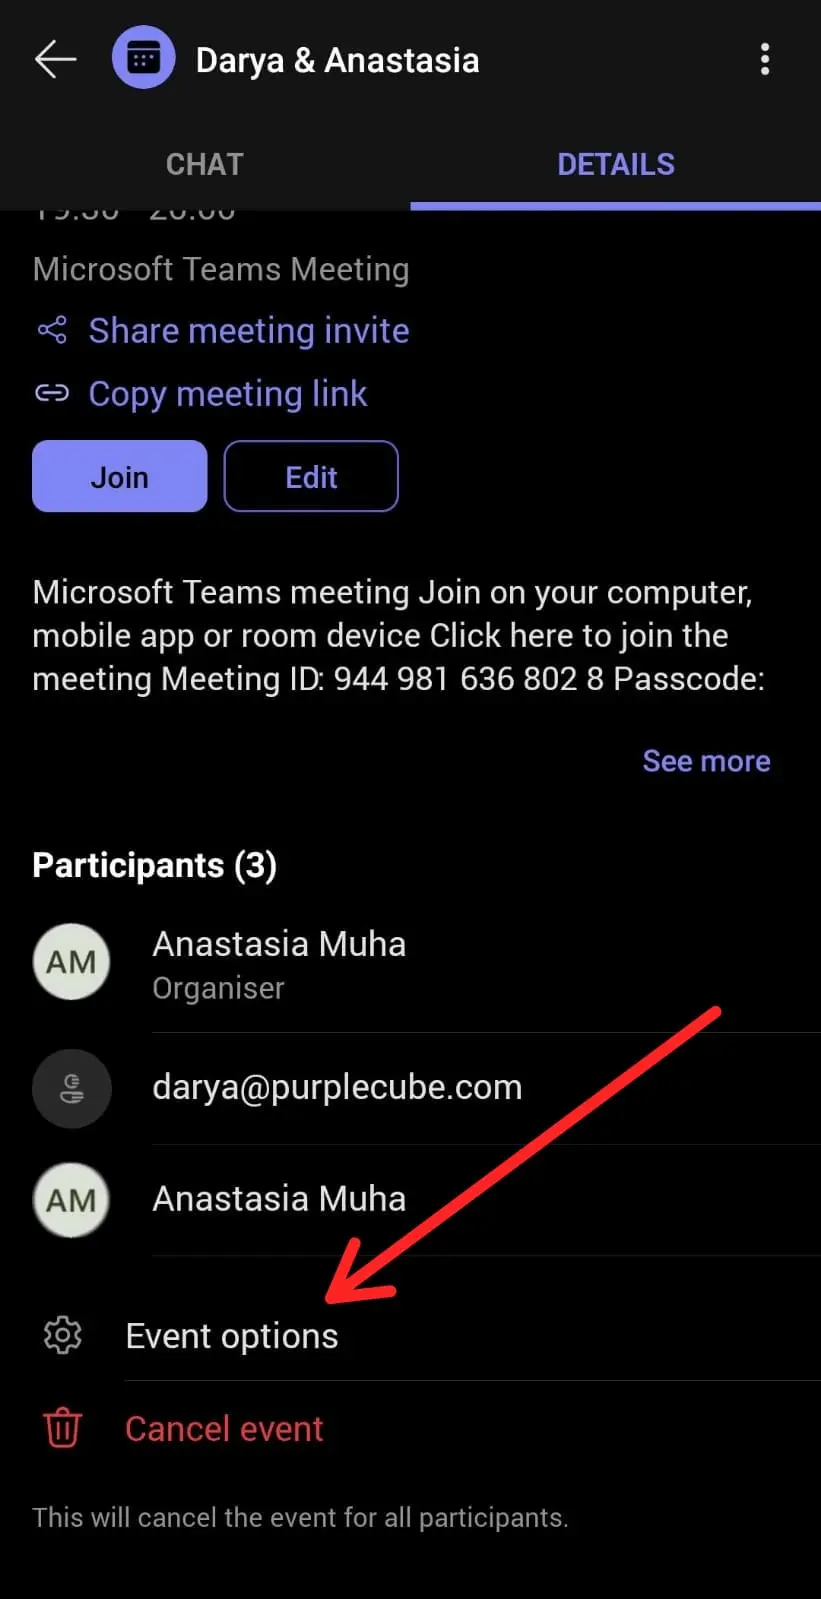
Cómo programar una reunión en Microsoft Teams
Si estás buscando la forma más rápida de programar una reunión en Microsoft Teams, estás en el lugar correcto. ¡Sigue leyendo para saber cómo hacerlo!
A. Cómo programar una reunión de equipo en el escritorio
A continuación, se explica cómo programar una reunión de Teams en el escritorio:
- Inicie Microsoft Teams en su escritorio.
- Seleccione 'Programar una reunión' que se encuentra debajo del 'Escriba un mensaje nuevo' campo. Esta acción lo redirigirá a la pestaña Calendario.
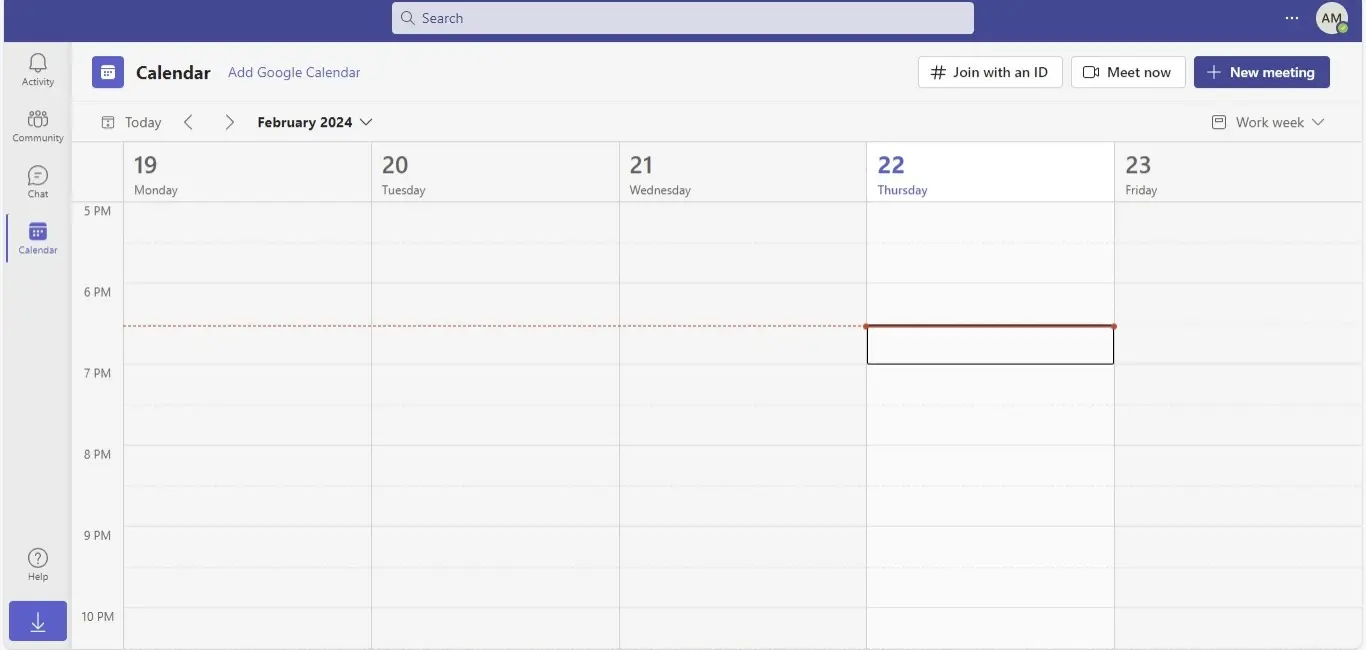
- En la esquina superior derecha, haz clic en el 'Nueva reunión' opción para seleccionar la fecha y hora deseadas para su reunión.
- En el formulario que aparece, introduce el título de la reunión, envía las invitaciones y agrega otros detalles importantes.
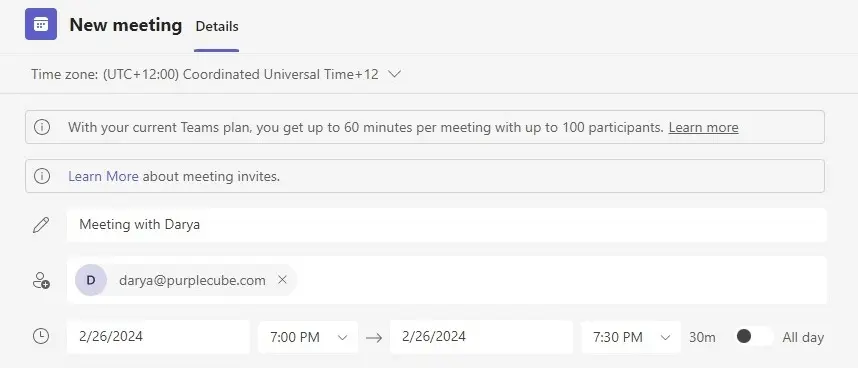
- Para finalizar, haga clic 'Ahorrar'.
NOTA: Dejemos que los equipos Asistente de programación lo ayudan a identificar una hora de reunión que se adapte a usted y a los miembros de su equipo de manera efectiva.
B. Cómo programar una reunión de equipo en dispositivos móviles
La programación de una reunión en Teams no se limita al uso de escritorio; también puede hacerlo mediante la aplicación móvil, disponible para dispositivos Android y Apple.
A continuación, te explicamos cómo programar una reunión de Teams en dispositivos móviles:
- Pulsa «Reuniones del calendario» en la parte inferior de la aplicación.
- Haga clic en el 'Programar una reunión' opción en la esquina inferior derecha.
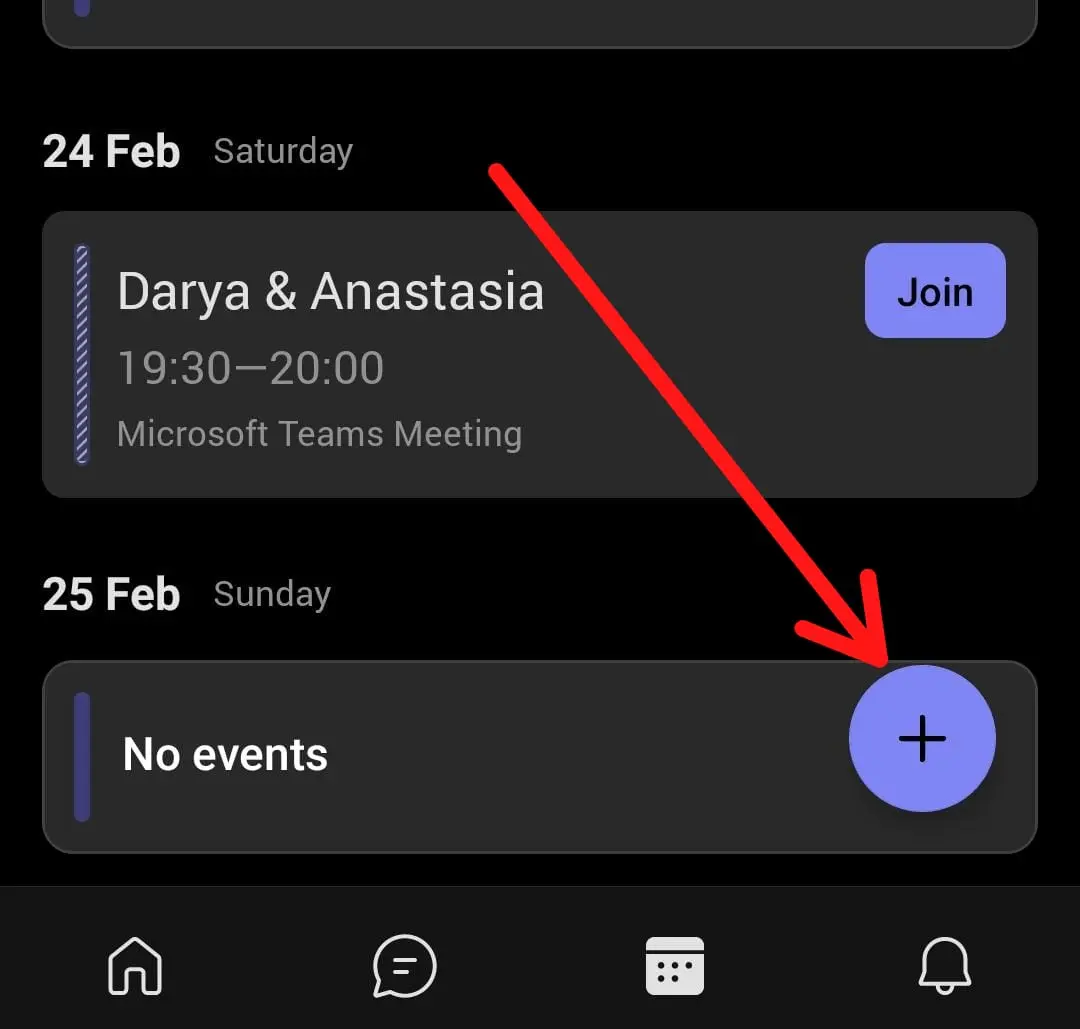
- En el «Nuevo evento» formulario que aparece, toca el 'Añadir participantes' botón para seleccionar los miembros del equipo a los que deseas invitar.
- Introduzca el título de la reunión y establezca la fecha y la hora.
- Una vez que hayas rellenado todos los detalles, toca «Hecho» para completar el proceso de programación.
NOTA: Para compartir la reunión con todo un canal, selecciona «Compartir en un canal».
Cómo unirse a una reunión de Microsoft Teams
Si unirse a una reunión de Teams es algo que no has hecho antes, ¡también tenemos lo que necesitas!
A. Cómo unirse a una reunión de equipos en el escritorio
A continuación, le indicamos cómo unirse a una reunión de Teams en el escritorio:
- Abre Microsoft Teams en tu escritorio. Si es necesario, inicia sesión con los detalles de tu cuenta.
NOTA: Si no tienes una cuenta, ¡no te preocupes! No es necesario crear una cuenta en la plataforma, ya que MS Teams también te permite unirte con tu cuenta de Gmail.
- Busca la reunión a la que quieres unirte. Si no has recibido ningún correo electrónico de invitación a una reunión, puedes localizar tu reunión de dos maneras:
- A través del calendario: Haga clic en el 'Calendario' pestaña en la barra lateral para ver tus reuniones. Busca a la que te estás uniendo y haz clic en ella.
- A través de un chat o canal: Si la reunión está vinculada a un chat o canal, es posible que también encuentres un enlace a la reunión allí.
- Cuando haya encontrado su reunión, haga clic en «Unirse» botón. Hágalo unos minutos antes de la hora de inicio de la reunión para ajustar primero la configuración.
- Antes de participar oficialmente en la reunión, puedes decidir si quieres encender la cámara y el micrófono.
- Con la nueva configuración establecida, pulsa el «Únete ahora» botón para acceder a la reunión en sí. Ya está listo para participar, compartir o simplemente escuchar.
- Durante la reunión, no dudes en usar el chat para enviar mensajes, compartir tu pantalla si es necesario o usar las reacciones para interactuar con la presentación.
- Cuando finalice la reunión, o si simplemente necesita salir, haga clic en «Cuelga» botón, que parece un teléfono rojo, para salir.
B. Cómo unirse a una reunión de equipo en dispositivos móviles
A continuación se explica cómo unirse a una reunión de Teams en un dispositivo móvil:
- Abre la aplicación Microsoft Teams en tu smartphone. Puedes descargarla desde Google Play Store para Android o desde la App Store para dispositivos iOS.
- Encuentra tu reunión. Si el enlace a la reunión no está incluido en la invitación a la reunión, puede localizarlo de dos maneras:
- A través del calendario: Pulsa el 'Calendario' icono en la parte inferior para ver las reuniones programadas y seleccionar a la que desea unirse.
- A través de notificaciones: Si la reunión está vinculada a un equipo o canal, es posible que encuentres una notificación allí.
- En la página de la reunión, pulse «Unirse» botón unos minutos antes de la hora de inicio. Pasarás a una pantalla en la que podrás gestionar la configuración.
- Selecciona si quieres encender o apagar la cámara y el micrófono, y elige la salida de audio, como auriculares o un altavoz.
- Tras la configuración, toca «Únete ahora» para unirse a la reunión. Ya estás en la reunión del equipo, listo para participar o escuchar.
- No dudes en utilizar el chat para comunicarte con otras personas, compartir contenido si es necesario y utilizar las reacciones para interactuar con el contenido de la reunión.
- Cuando estés listo para salir o cuando termine la reunión, toca el «Cuelgabotón ', que se muestra como un icono de teléfono rojo, para salir.
Cómo grabar una reunión de Microsoft Teams en cualquier dispositivo
Grabación de reuniones de Microsoft Teams seguramente tiene innumerables beneficios. Y con una plataforma de automatización de reuniones basada en la inteligencia artificial como MeetGeek, todo el proceso se convierte en una experiencia perfecta, independientemente de la licencia de Teams que tengas.
Además de grabar y transcribir automáticamente sus reuniones, MeetGeek ofrece varias funciones potentes que automatizan todas sus después de la reunión tareas.
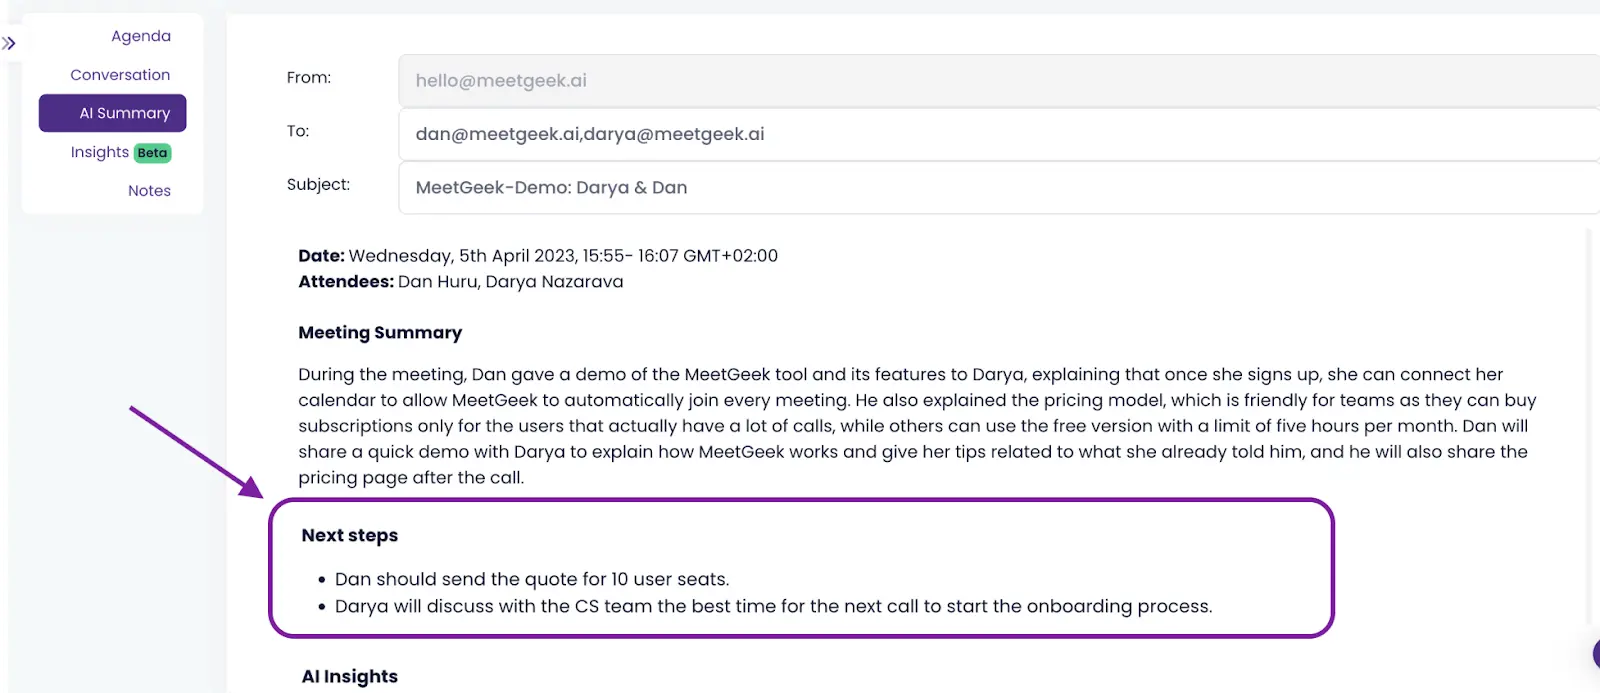
- Resumen e intercambio de reuniones con IA: MeetGeek automáticamente resume su reunión, identificando las discusiones, decisiones y tareas clave. Puede compartir fácilmente este resumen con los participantes de la reunión o con cualquier otra persona que pueda beneficiarse de la información compartida durante la reunión.
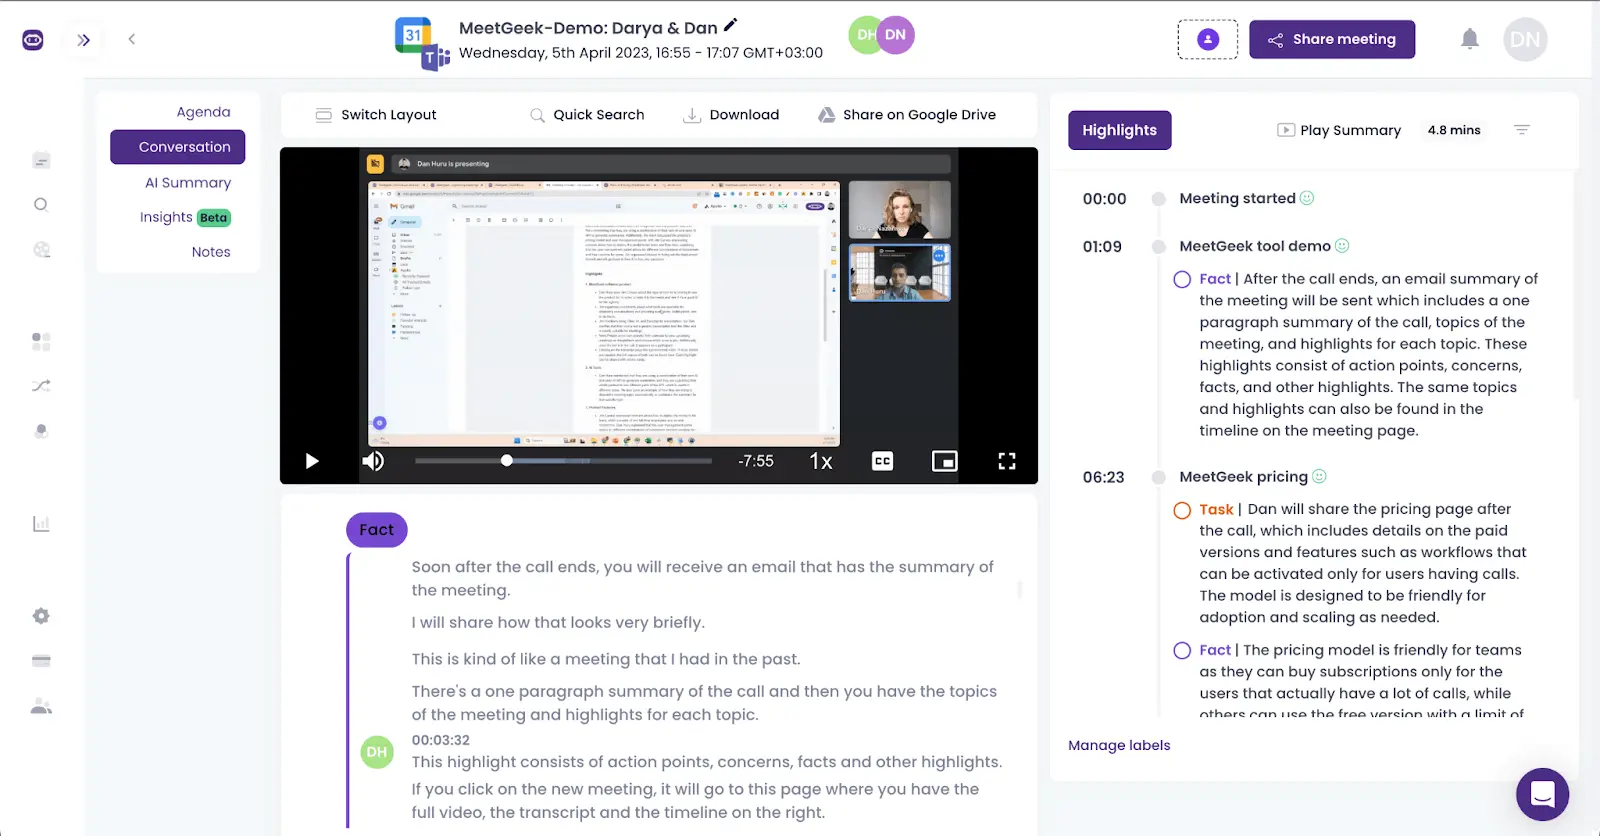
- Repositorio de reuniones con opciones para compartir: MeetGeek ahorra todas tus reuniones en un solo lugar, para que puedas volver a ver, descargar o compartir tus conversaciones con otras personas a través de un enlace seguro. Esto facilita que los asistentes y las partes interesadas vuelvan a visitar la reunión cuando les resulte más cómodo.
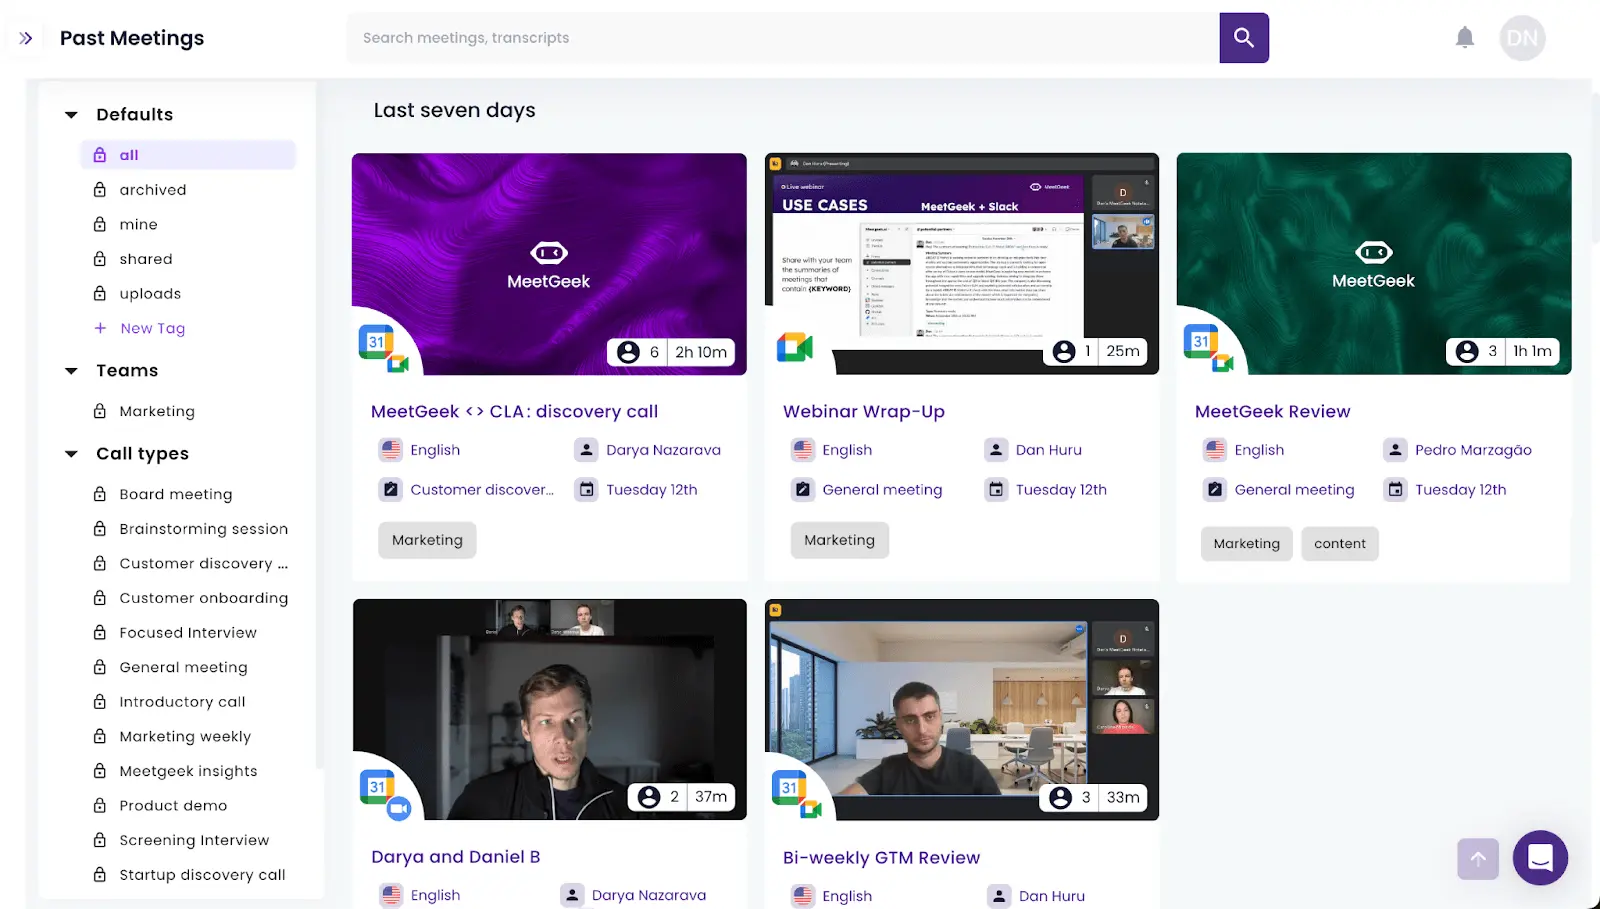
- Detección de elementos de acción: A través de su función de detección de tareas, MeetGeek identifica y extrae todos los puntos de acción del debate general, lo que le permite ahorrar horas.
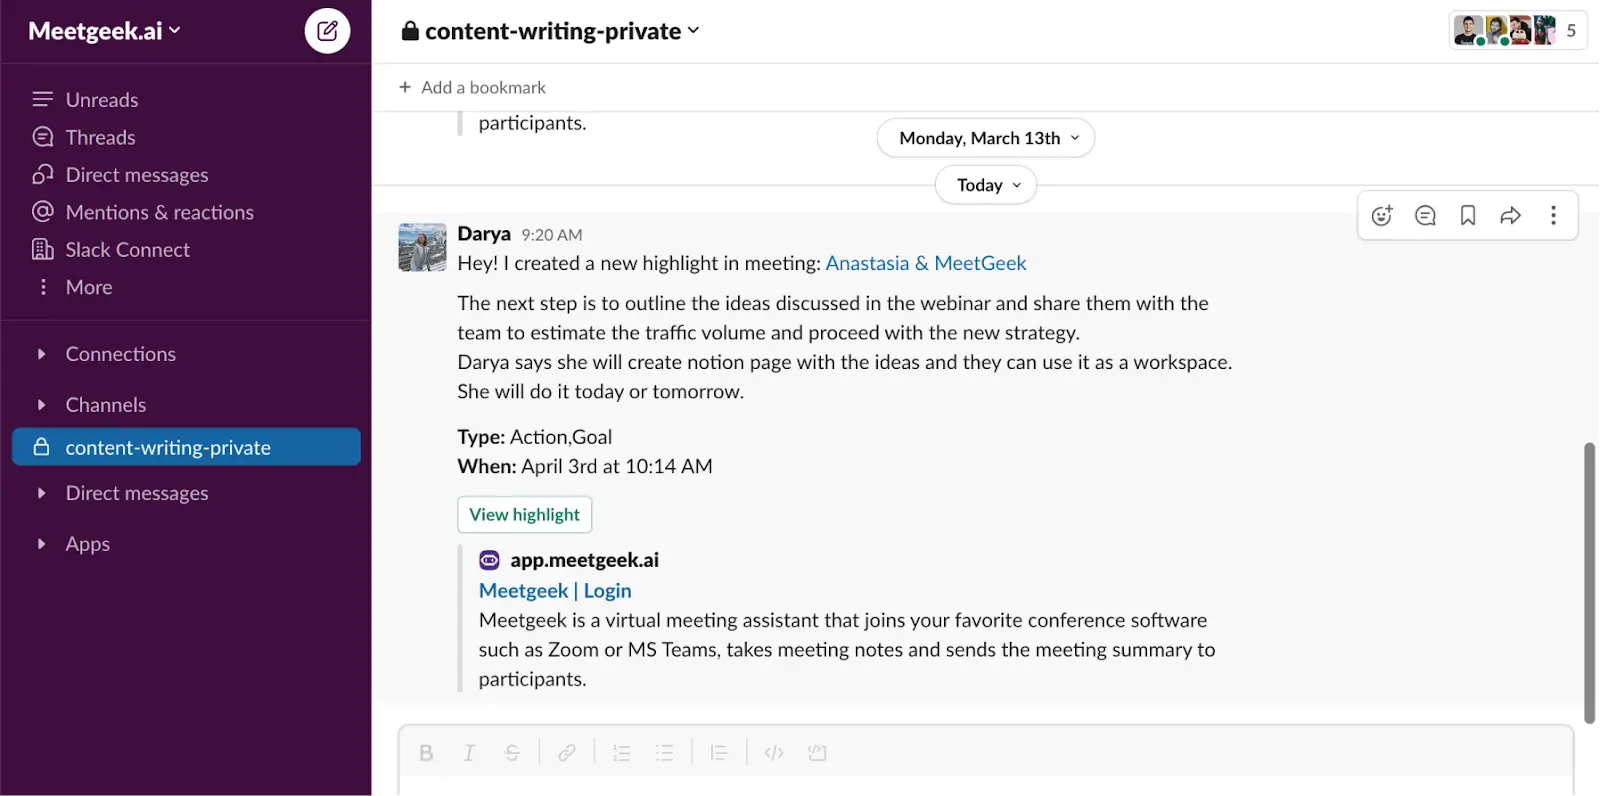
- Flujos de trabajo fluidos: Además, puedes configurar flujos de trabajo personalizados que actualizará directamente tu espacio de trabajo compartido con elementos de acción. Este nivel de automatización te permite comprobar fácilmente el progreso de los proyectos para asegurarte de que las tareas avanzan y abordar cualquier desafío desde el principio.
- Análisis simplificado de reuniones: Al evaluar el éxito de los diferentes tipos de reuniones, es fundamental reconocer que no todos los indicadores clave de rendimiento (KPI) se aplican de forma universal. MeetGeek otorga a cada reunión una puntuación única, determinada por los KPI que haya seleccionado para la plantilla de esa reunión.
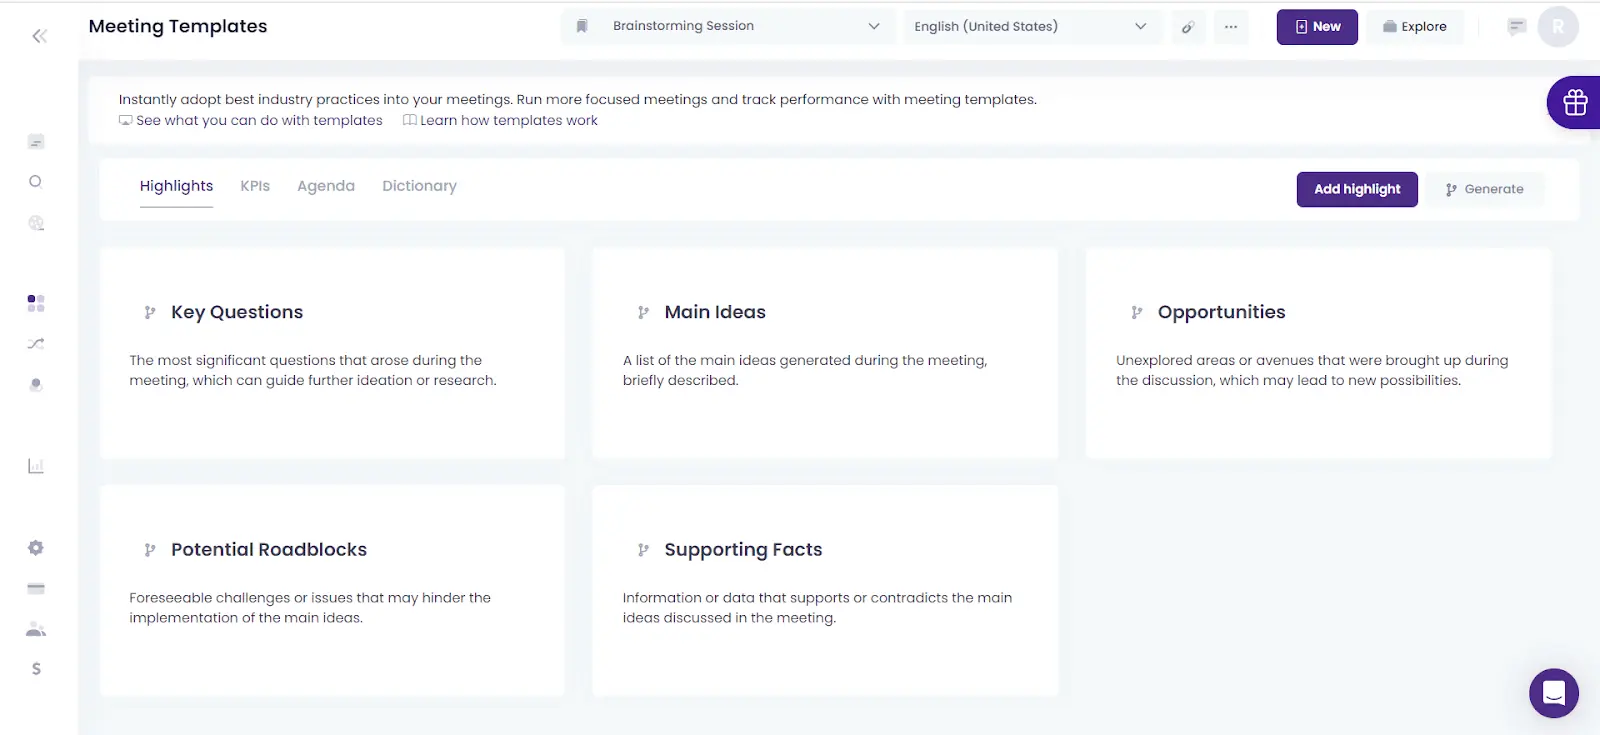
NOTA: Esto sistema de puntuación se extiende para proporcionar una puntuación colectiva mensual y por equipos, lo que ofrece una visión general del desempeño y garantiza que sus evaluaciones estén enfocadas y alineadas con sus objetivos.
¿Cómo configuro una cuenta MeetGeek?
Integración de MeetGeek con Microsoft Teams simplifica el proceso de grabación y enriquece la experiencia posterior a la reunión.
A continuación, le indicamos cómo usar MeetGeek para grabar sus reuniones de Teams en cualquier dispositivo:
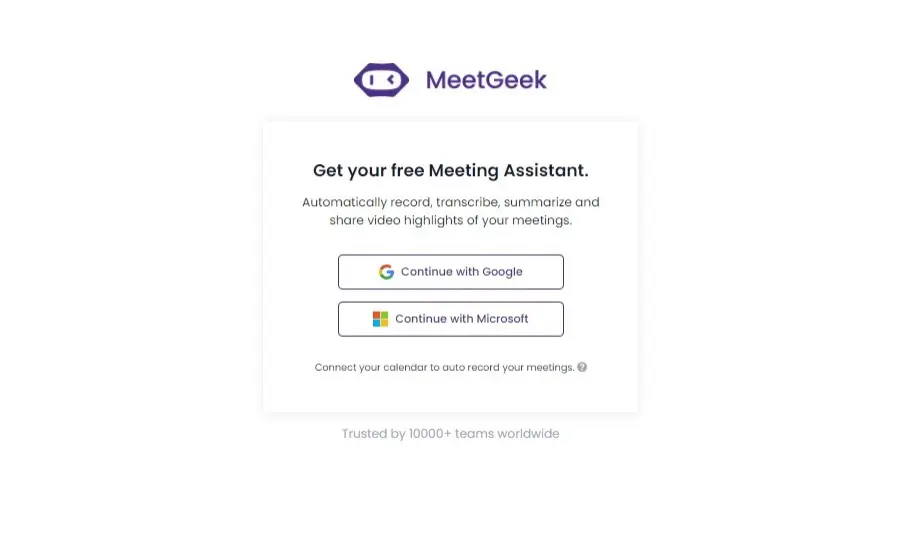
Paso #1: Inscríbase para un cuenta MeetGeek gratuita directamente con tu cuenta Microsoft, ¡sin necesidad de credenciales adicionales!
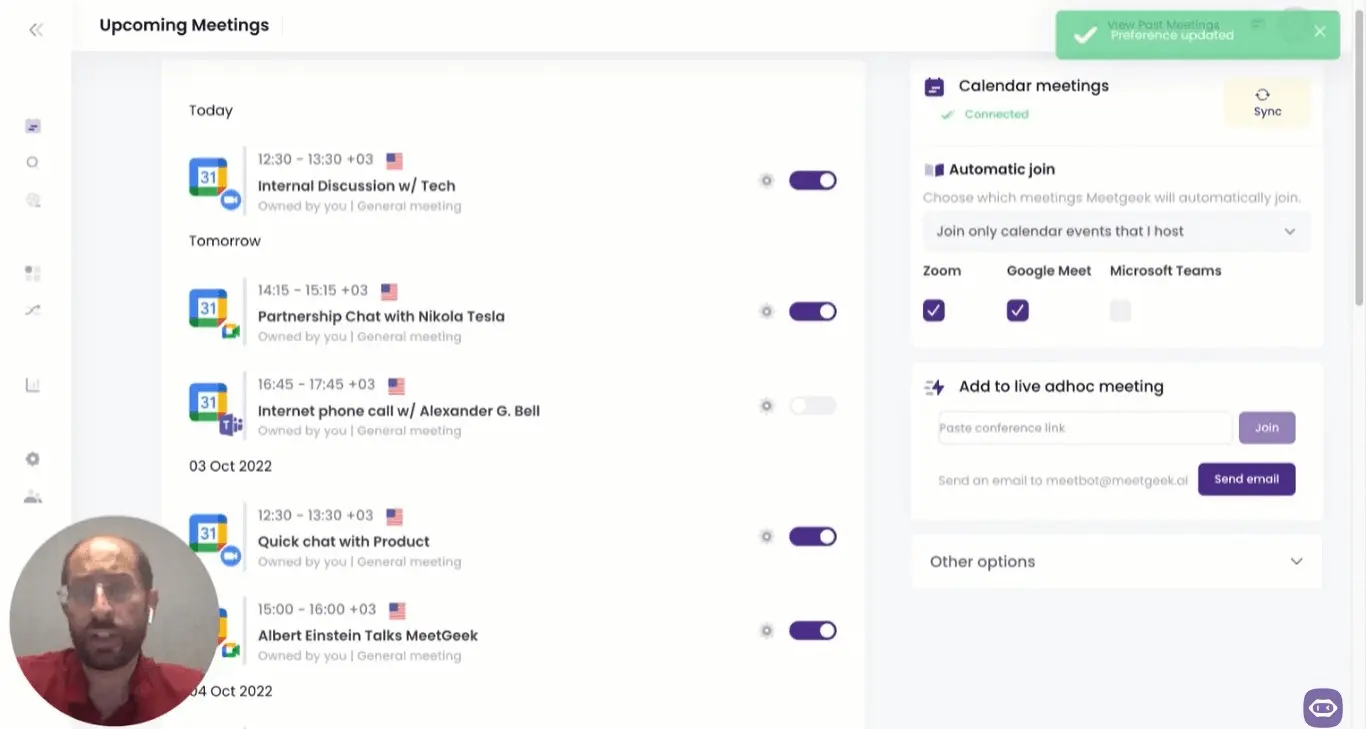
Paso #2: Sincronice su calendario de Microsoft con MeetGeek para que el asistente virtual pueda unirse automáticamente a sus reuniones. Si solo puede acceder a la reunión a través de un enlace de reunión, péguelo en el «reunión ad hoc en vivo»' bar.
Paso #3: Cuando comienza la reunión, MeetGeek se une a la conversación como un participante propio, capturando vídeos, audio y pantallas compartidas, todo ello respetando las normas de privacidad y consentimiento.
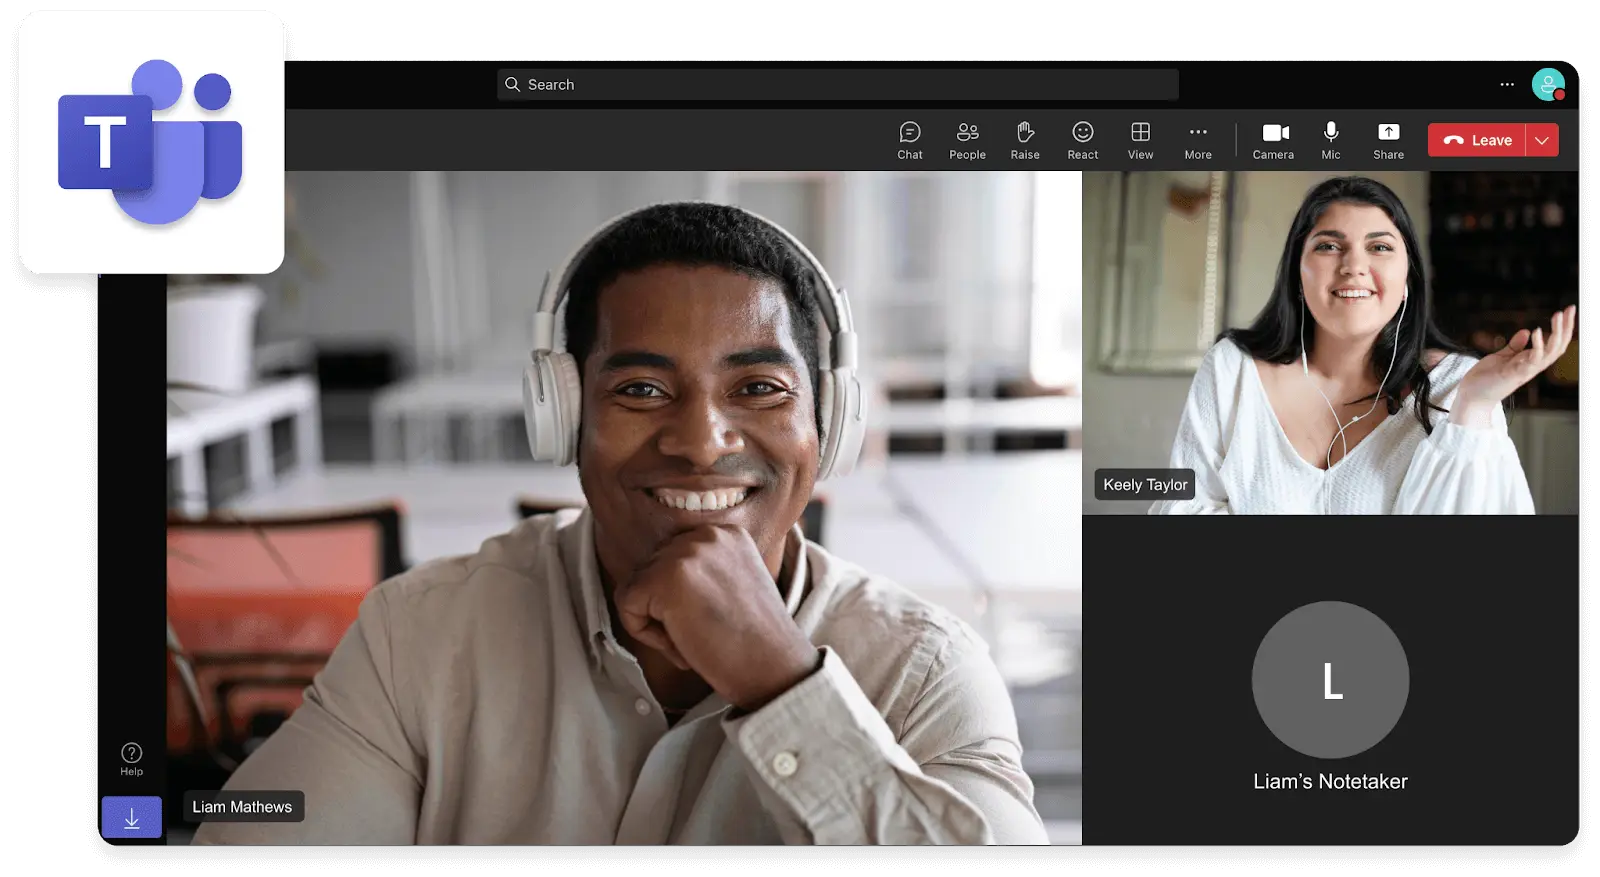
CONSEJO PROFESIONAL: MeetGeek puede incluso asistir a las reuniones en las que no puedes participar, por lo que siempre puedes estar al tanto, pase lo que pase.
¡Es lo más fácil posible! Empieza a usar MeetGeek gratis ¡para disfrutar de todos los beneficios adicionales de tener una plataforma de automatización de reuniones al alcance de su mano!
Cómo solucionar problemas comunes con las reuniones de Microsoft Teams
La solución de problemas comunes en las reuniones de Microsoft Teams consiste en identificar qué es lo que está mal y aplicar la solución correcta.

A continuación, se explica cómo solucionar los problemas más comunes en Microsoft Teams:
- Problemas de audio y vídeo
- Confirma que el micrófono, los auriculares y la cámara estén conectados y encendidos. Si son Bluetooth, comprueba que estén conectados.
- Ve a Configuración > Dispositivos en Teams para elegir tus dispositivos de audio y vídeo preferidos. Haz una prueba rápida para asegurarte de que funcionan.
- Los equipos necesitan acceso a tu micrófono y cámara. Asegúrate de haberlo permitido en la configuración de tu ordenador.
- Problemas de conectividad
- Si tienes problemas, cambia entre Wi-Fi y una conexión por cable, o intenta volver a conectarte a la red.
- ¿No puedes unirte? Cerrar y volver a abrir rápidamente la aplicación Teams podría solucionarlo.
- Si no puedes hacer clic en el enlace de la reunión, prueba a unirte a través del calendario de Teams o a introducir manualmente el ID de la reunión.
- Superar los problemas de calidad
- Las aplicaciones que consumen ancho de banda pueden reducir la calidad de las reuniones. Cierre todo lo que no necesite.
- ¿Ancho de banda bajo? Apagar el vídeo puede hacer que el audio sea más nítido.
- Si encuentras problemas, usa la herramienta de prueba de red de Teams (Configuración > Red) para encontrar y solucionar cualquier problema.
- Interrupciones de eco y ruido
- Los auriculares o auriculares pueden evitar que el micrófono capte la salida del altavoz, lo que reduce el eco.
- Si no hablas, permanece en silencio. Esto reduce el ruido de fondo y el eco para todos.
- Problemas de uso compartido y permisos
- Asegúrese de tener autorización para compartir contenido en la reunión. El organizador puede ajustar esta configuración.
- Las aplicaciones de Teams desactualizadas pueden causar problemas. Actualiza las tuyas a través de la aplicación o de la tienda de tu dispositivo.
- Si compartir contenido no funciona, salir de la reunión y volver a unirse a ella puede resultar útil.
- Estabilidad de Internet
- Para una conexión a Internet más confiable, usa una conexión por cable si es posible.
- Los problemas de conectividad a menudo se resuelven con un simple reinicio del hardware de Internet.
Si sigues estos consejos, podrás abordar la mayoría de los problemas de las reuniones de Teams de forma frontal, garantizando una reunión más fluida y fluida. reunión productiva experiencia.
Consejos profesionales para mejorar las reuniones de tu equipo
Ahora, analicemos algunos consejos prácticos que le ayudarán a mejorar su Reuniones de equipos:
- Programe reuniones con antelación
- Fomente el uso de la cámara
- Aproveche la grabación de reuniones
- Interactúa con las encuestas, las preguntas y respuestas y la pizarra
- Optimizar las notificaciones
- Organice a los participantes de
- Seguimiento posterior a la reunión
1. Programe reuniones con antelación
Cuando programe reuniones, incluya siempre el agenda de la reunión en la invitación a la reunión. Esto no solo informa a los participantes sobre el propósito de la reunión, sino que también les permite prepararse con antelación, lo que garantiza un debate centrado y eficiente.
2. Fomente el uso de la cámara
Abogue por encender las cámaras para aumentar la conexión y el compromiso entre los participantes. Para abordar los problemas de privacidad o los fondos que distraigan, fomente el uso de fondos borrosos o personalizados.
NOTA: Esta función no solo mantiene la profesionalidad, sino que también añade un toque personal, ya que permite a los participantes expresarse sin dejar de centrarse en el contenido de la reunión.
3. Aproveche la grabación de reuniones
La grabación de las reuniones de Teams tiene un valor incalculable para quienes no pueden asistir a las discusiones o desean volver a visitarlas.
Asegúrese siempre de notificar a los participantes que la reunión se grabará desde el principio, para garantizar que cumple con las normas de privacidad y consentimiento. Deja claro que la grabación de la reunión sirve como material de referencia y estará disponible para todos los participantes de la reunión.
CONSEJO PROFESIONAL: Si no estás seguro de cómo abordar este paso, consulta estas plantillas de descargo de responsabilidad para la grabación de reuniones ¡para inspirarte!
4. Interactúe con las encuestas, las preguntas y respuestas y la pizarra
Usa las encuestas para tomar decisiones rápidas o evaluar las opiniones, las sesiones de preguntas y respuestas para abordar las consultas de manera eficiente y la pizarra blanca para intercambiar ideas o explicar conceptos de forma visual. Esto puede hacer que las reuniones sean más dinámicas y participativas, y mantener a los asistentes involucrados durante toda la conversación.
5. Optimiza las notificaciones
Para evitar distracciones durante las reuniones, optimiza la configuración de notificaciones en Teams. Esto incluye silenciar las alertas no esenciales y personalizar las notificaciones para canales o reuniones específicos.
Al minimizar las interrupciones, se garantiza un flujo más fluido de la reunión y se mantiene la concentración de los asistentes en el debate en cuestión.
6. Organice a los participantes de
Utilice Etiquetas y Salas para grupos pequeños para gestionar y organizar a los participantes de la reunión de forma eficaz:
- Etiquetas te permiten comunicarte con grupos específicos dentro de un equipo más grande, lo que facilita dirigirte a las partes pertinentes.
- Salas para grupos pequeños son perfectos para dividir a los participantes en grupos más pequeños para discusiones o talleres detallados, fomentando conversación y colaboración más profundas sobre temas específicos.
7. Seguimiento posterior a la reunión
El seguimiento después de las reuniones es crucial y debe considerarse parte de la etiqueta de la reunión. Enviar un correo electrónico de seguimiento o envía mensajes a través de Teams, incluidos los puntos clave, las acciones asignadas y los plazos.
Esto no solo refuerza los resultados de la reunión, sino que también hace que todos rindan cuentas y estén al día con sus tareas.
¡Potencie sus reuniones de Microsoft Teams con MeetGeek!
Ya sea que esté coordinando con colegas del otro lado del pasillo o en todo el mundo, Microsoft Teams ofrece una forma perfecta de unir a todos.
Si sigues la guía paso a paso que describimos, ahora puedes programar, personalizar y llevar a cabo reuniones de Teams con confianza, incluso si acabas de empezar. Recuerda que el objetivo de cualquier reunión es fomentar la colaboración, generar ideas e impulsar acciones.
¿Estás listo para transformar tus reuniones de Teams en potentes sesiones de productividad? Prueba MeetGeek y descubra la diferencia que puede marcar en sus próximas reuniones. ¡Su equipo y su agenda de reuniones se lo agradecerán!
.avif)


