


To record a Teams meeting with a work or school account, select More actions (...) in the meeting controls, then Record and transcribe > Start recording. Everyone in the meeting is notified that recording has started, and a transcript starts at the same time. When the meeting ends, the recording appears in the meeting chat and is saved to the organizer's OneDrive, or to SharePoint for channel meetings.
Teams' built-in recorder only appears if your account, meeting role and IT policy allow recording. You need a Microsoft 365 work or school license that includes recording, your IT admin has to allow it, and you have to be the organizer or someone from the same organization. Guests, external attendees and anonymous participants can't start a Teams recording.
The free version of Teams works differently. There, you select More actions > Start recording, and only participants with a Microsoft 365 Personal, Family or Premium subscription can record. The recording stays in the meeting chat for 30 days.
If the option is grayed out or missing, the sections below explain why and what you can do instead, including how to record when you're not the host.
Who Is Allowed to Record a Teams Meeting?
In a work or school meeting, you can record if you organize it, or belong to the organizer's organization, and your license and IT policy allow recording. Microsoft lists Office 365 Enterprise E1, E3, E5, F3, A1, A3 and A5, and Microsoft 365 Business, Business Premium and Business Essentials as eligible licenses in its guide to starting and stopping meeting recordings.
Work or school Teams and Teams Free use two different permission models:
| Your account or role | Can you start a Teams recording? |
|---|---|
| Work or school: meeting organizer with an eligible license | Yes, if your IT admin allows recording |
| Work or school: colleague from the organizer's organization | Yes, with the same conditions |
| Work or school: guest in the organizer's Teams | No |
| Work or school: user from another organization | No |
| Work or school: anonymous participant | No |
| Teams Free: participant with Microsoft 365 Personal, Family or Premium | Yes |
| Teams Free: participant without one of those subscriptions, or on a work or school plan | No |
Table last updated: September 25, 2026.
Two settings can narrow this further. With Teams Premium or a Microsoft 365 Copilot license, the organizer can use Who can record and transcribe in the meeting options to let organizers and co-organizers, organizers, co-organizers and presenters, or no one start a recording or transcript. And if an attendee's organization uses a compliance recording policy, that organization can record the meeting automatically, whatever your own settings say.
If the table says you can't record, a notetaker can still join the call for you. MeetGeek's Microsoft Teams integration works whether you're the host or a participant, and the section on recording when you're not the host covers how.
Can You Record a Teams Meeting Without Asking?
Teams always notifies participants when recording starts, but by default it doesn't ask each person to agree. Organizations can turn on a separate policy that requires participant agreement: participants then stay muted, with camera and content sharing off, until they agree to be recorded and transcribed.
Other tools can record without a visible notice. Consent requirements vary by jurisdiction and organization policy, so check the rules that apply to the participants before recording, including whether it's legal to record someone without permission where they are.
To stay on the safe side:
- Get consent from everyone in the meeting;
- Say that the meeting will be recorded before you start;
- Explain how the recording will be used and where it will be stored.
A good way to do this is one sentence at the start of the call, for example that the recording helps with note-taking and keeps a record of decisions. If you use an AI tool to record, also read about privacy and security when you use an AI meeting assistant.
How to Record a Teams Meeting Step by Step
These steps are for work or school accounts in the Teams desktop app and in Teams on the web. Before an important meeting, a short test call is a quick way to check that your microphone works and that the recording option is there.
- Start or join the meeting;
- Select More actions (...) in the meeting controls;
- Select Record and transcribe > Start recording. For a normal audio and video recording, select Confirm. For audio only, open More options in the Start recording dialog, select Audio only under Choose what to record, then select Confirm;
- To stop, go back to More actions > Record and transcribe and select Stop recording.
Stop recording ends the recording and the transcript together. If you only want to stop the transcript, select Stop transcription instead, and the recording keeps running.
On the Teams mobile app, select More options > Start recording in the meeting controls. Everyone in the meeting is notified.
In work and school Teams meetings, the recording continues if the person who started it leaves. It stops when everyone leaves; if someone stays, Teams ends and automatically restarts the recording every four hours until the last person leaves. Teams Free is different: Microsoft says the recording stops if the person who started it leaves.
One-on-one and group calls work the same way: select More actions > Record and transcribe > Start recording. For call recordings, only the person who started the recording can share or download it.
How to Record Teams Meetings Automatically
If you want every session of a meeting recorded, the organizer can turn on Record and transcribe automatically in that meeting's Meeting options. The recording then starts as soon as the meeting does, without anyone pressing a button. This option isn't available on the Microsoft 365 Education A1 plan.
Where Do Teams Recordings Go?
Where Teams recordings are stored depends on the type of meeting:
- Channel meetings are saved to SharePoint, in the channel's files;
- All other meetings are saved to the meeting organizer's OneDrive, in the Recordings folder;
- To open a recording, look in the meeting chat or the channel conversation, or open the meeting in your Teams calendar and go to Recap.
The transcript is saved with the recording. If the transcript is what you need, our guide on how to transcribe a Microsoft Teams meeting covers the options.
How Long Do Teams Recordings Last?
In work and school accounts, new Teams meeting recordings and transcripts expire after 120 days by default, according to Microsoft's recording expiration policy. This is an organization policy default: your IT admin can set a different period or turn expiration off, and for Microsoft 365 Education A1 users the maximum default is 30 days.
If you own a recording, you can change or remove its expiration date:
- Open the recording in OneDrive or SharePoint;
- Open the recording's details;
- Change or remove the expiration date.
On Teams Free, recordings stay in the cloud for 30 days. Download any recording you want to keep before that.
When a recording expires, it moves to the OneDrive or SharePoint recycle bin, and the owner gets an email. Microsoft says the owner has up to 90 days to recover an expired Teams recording; once it's deleted from the recycle bin, it can't be recovered.
What Teams Recordings Don't Capture
The built-in recorder saves the audio, video and screen sharing, but not everything that happens in a meeting. According to Microsoft, a Teams recording doesn't include:
- More than four video streams at the same time;
- Whiteboards and annotations;
- Shared notes;
- Content shared from apps inside the meeting;
- Videos or animations embedded in PowerPoint Live presentations.
If one of these matters, for example a whiteboard session, save it separately before the meeting ends.
How to Record a Teams Meeting When You're Not the Host
When Teams won't let you record, because you're a guest, you're from another company, or your organization has restricted recording, you have three options:
- Ask the organizer to record. The recording appears in the meeting chat, but guests and external attendees may still need the organizer to share it with them directly;
- Send a notetaker to the meeting. A tool such as MeetGeek joins the call as a separate participant and records it, even if you're not the host;
- Record on your own computer, without a bot. MeetGeek's desktop app records Teams meetings in the Teams desktop app, and its Chrome extension works with Teams in the browser.
Even when you record without a bot, you're responsible for telling participants and following consent and privacy rules.
The steps below use MeetGeek's notetaker, which joins your scheduled Teams meetings from your calendar.
Step 1: Create a MeetGeek Account
Sign up at MeetGeek with your Microsoft or Google account. The free plan includes 3 hours of transcription per month and records meetings of up to 2 hours each, with an AI summary for every meeting. MeetGeek's pricing page lists HD video recording and video storage from the Business plan.
Step 2: Connect Your Calendar
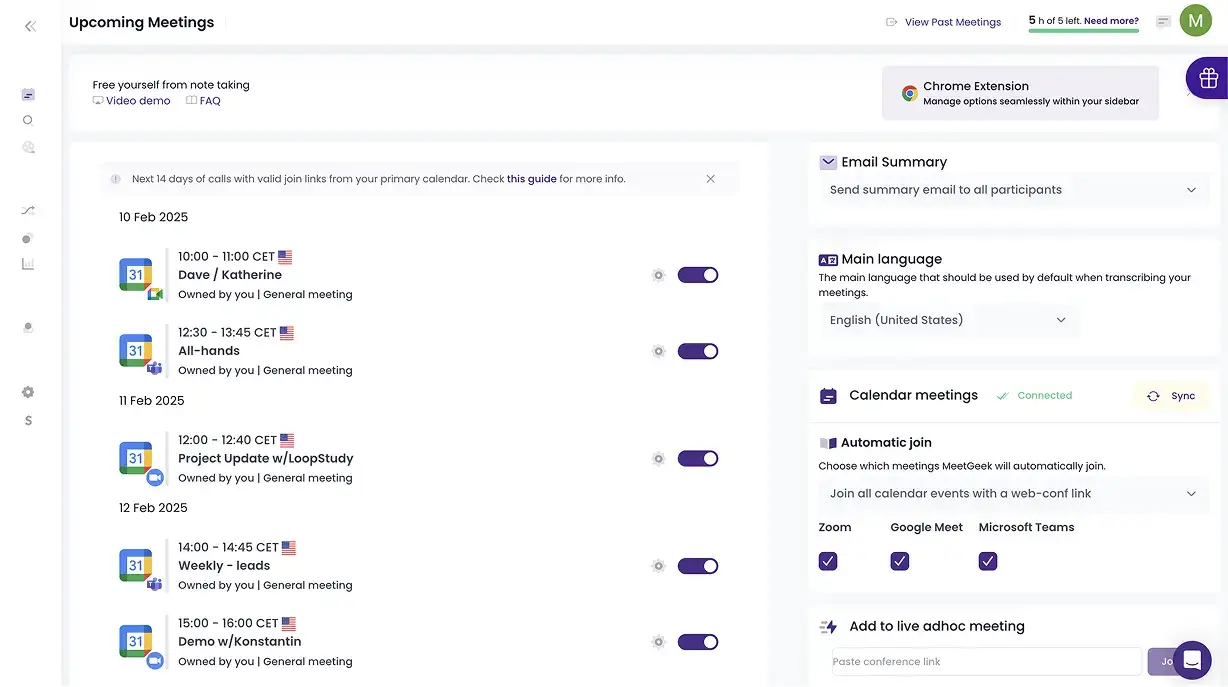
Once you're in, connect your calendar. MeetGeek then sees your scheduled meetings on:
- Microsoft Teams;
- Zoom;
- Google Meet.
You can choose to record all of them or only specific ones. For an instant meeting that isn't in your calendar, paste the Teams meeting link into the Upcoming Meetings page, or record it with the desktop app.
Step 3: Let the Notetaker Into the Meeting
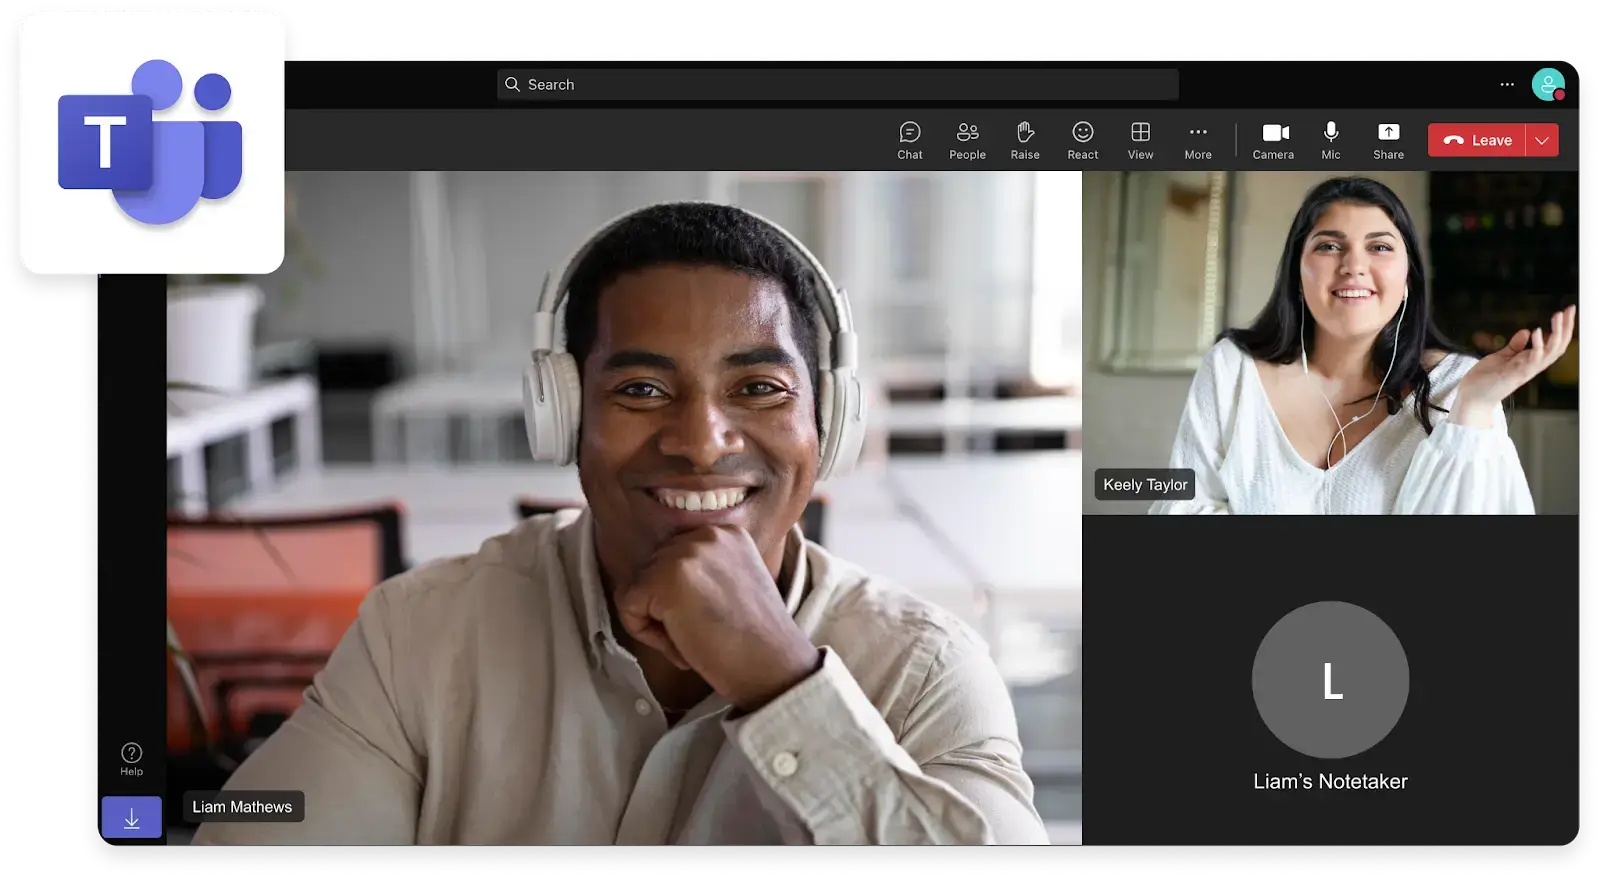
At the scheduled start time, the MeetGeek notetaker joins as a separate participant, with a name that includes "MeetGeek Bot". It joins whether or not you've joined yourself, and starts recording once at least one participant who isn't a bot is in the meeting.
If the meeting has a lobby, the notetaker waits there for up to 10 minutes for the host to admit it, then leaves. The notetaker joins as an unauthenticated user, so if the meeting requires authentication to join, the organizer or IT admin has to allow unauthenticated users before it can get in.
Step 4: Open the Recording, Transcript and Summary
MeetGeek processes the meeting after it ends, usually within 5 to 10 minutes depending on its length. By default, participants receive the summary email; on Pro and above, you can send it to all participants, team members only or yourself only. In your MeetGeek account you can:
- Replay the recording;
- Read the full transcript;
- Read the AI meeting minutes with decisions and action items;
- Share the recording with people outside your organization.
If you're often a guest in other companies' Teams calls, a notetaker lets you keep your own record of what was said.
What You Can Do With a Meeting Recording After the Call
Many people spend a large part of their week in meetings. In Calendly's 2024 State of Meetings report, 46% of respondents said they have three or more meetings a day, and 59% of enterprise employees spend five or more hours a week in meetings. 45% said the time they spend in meetings reduces their productivity.
MeetGeek also helps after the call, so you can find what you need without rewatching the recording.
AI Chat Across Your Meetings
MeetGeek's AI Chat lets you ask questions about your past meetings in plain language. You can pull the action items from several meetings at once, find what was decided about a project, or draft a follow-up email from the call.
Meeting Templates and Highlights
Meeting templates set the structure of the summary for each type of meeting, such as a sales call, a stand-up or an interview. Highlights then use the keywords you choose to pick out the parts of the meeting that matter most, so you can jump straight to them.
Summaries and Action Items in Your Tools
After each call, MeetGeek writes a summary with the key points, decisions and action items. On paid plans, you can send it automatically to Slack, Notion, your CRM or a Google Doc, or connect 10,000+ apps through Zapier, Make and n8n. MeetGeek's meeting insights also show patterns across calls, for example for sales coaching or recurring customer issues.
"After implementing MeetGeek, our client retention went up by three months and our refunds decreased by 30%." Jay Feldman, Chief Marketing Officer at OtterPR, from our OtterPR case study.
Teams Built-In Recording vs. MeetGeek: Which One Fits?
Teams' built-in recorder and MeetGeek cover different use cases, and you can use both. The built-in recorder stays within the Microsoft 365 ecosystem, with recordings stored in OneDrive or SharePoint and surfaced in Teams. MeetGeek records whether or not you're the host, and it works across platforms. In MeetGeek's data from the first half of 2026, Microsoft Teams accounted for 38.6% of recorded meetings.
If all your meetings happen inside your own company's Teams, the built-in recorder may be all you need. If you also join clients' or partners' calls on Zoom or Google Meet, a recorder that works on those platforms too is more useful.
Here's how the two compare for recording:
| Feature | Teams built-in recording | MeetGeek |
|---|---|---|
| Who can record | The organizer and people from the same organization, with an eligible license | Host or participant, if Teams lobby and authentication settings let the notetaker join |
| Platforms | Microsoft Teams | Microsoft Teams, Zoom and Google Meet |
| Automatic recording | Per meeting, with Record and transcribe automatically | Every calendar meeting you choose |
| Transcript | Starts with the recording | Included, in 100+ languages |
| AI summary | Intelligent recap, with Teams Premium or Microsoft 365 Copilot | Included on every plan, including Free |
| Where recordings are kept | Organizer's OneDrive, or SharePoint for channel meetings; 120-day expiration by default unless the organization's policy changes it | Your MeetGeek workspace, for a period that depends on your plan |
| After the call | Recording, transcript and recap in the meeting chat and calendar | Summaries and action items sent to Slack, Notion, CRMs and 10,000+ apps (paid plans) |
| Cost | Included in eligible Microsoft 365 licenses; Teams Premium costs $10/user/month, paid yearly | Free plan, with paid plans for more hours and features |
Table last updated: September 25, 2026.
Which One Should You Choose?
If you only meet inside Microsoft Teams and you can record, the built-in recorder covers recording and transcripts. Teams Premium adds AI recaps inside Teams, and our Microsoft Teams pricing guide shows what each plan costs.
MeetGeek makes more sense if you:
- Join meetings on more than one platform;
- Need to record when you're not the host or you're a guest;
- Want summaries and action items sent to your other tools without copying them by hand;
- Want to search and ask questions across all your meetings in one place.
Key Takeaways
- In work or school Teams, you start a recording from More actions > Record and transcribe > Start recording, and the transcript starts with it;
- In work or school meetings, only the organizer and people from the same organization can record, with an eligible license and recording allowed by IT. Guests, external and anonymous attendees can't;
- On Teams Free, recording needs a Microsoft 365 Personal, Family or Premium subscription, and recordings last 30 days;
- Work and school recordings expire after 120 days by default unless the organization's recording policy changes the expiration period, so download or extend the ones you need;
- If you can't record in Teams, a notetaker or a no-bot desktop recorder can capture the meeting, as long as participants know they're being recorded.
Frequently Asked Questions
Why Can't I Record in a Teams Meeting?
The usual reasons are your role or your license. In work or school Teams meetings, guests, external users and anonymous participants can't start the built-in recording, and people from the organizer's organization need a license that includes recording and an IT policy that allows it. If the organizer has Teams Premium or Copilot, they may also have limited recording to organizers and co-organizers. On Teams Free, you need a Microsoft 365 Personal, Family or Premium subscription to record.
How Do You Record a Teams Meeting When You're Not the Host?
Ask the organizer to record it, or use a notetaker such as MeetGeek, which joins the meeting as a participant and records it for you. The host may need to admit it from the lobby. You can also record from your own computer with MeetGeek's desktop app. Either way, let the other participants know.
Can You Record a Teams Meeting for Free?
With a work or school account, recording is included in eligible Microsoft 365 licenses at no extra cost. On the free version of Teams, you need a Microsoft 365 Personal, Family or Premium subscription to record, and the recording is kept for 30 days. MeetGeek's free plan is another option, with 3 hours of transcription a month.
How Long Can a Teams Recording Be?
In work and school meetings there's no fixed maximum length: the recording runs until everyone leaves, and if someone stays, Teams ends and restarts it every four hours. Microsoft's Teams Free documentation doesn't mention this restart; there, the recording stops if the person who started it leaves.
How Do I Enable the Recording Option in Microsoft Teams?
Recording is turned on by your Microsoft 365 admin. In the Teams admin center, they go to Meetings > Meeting policies, open the policy that applies to you, and turn on meeting recording under Recording & transcription. If you still don't see the option, ask your IT team to check which policy is assigned to your account.
How Do I Record a Teams Meeting Just for Me?
Teams' built-in recorder doesn't create a private recording saved only for you. Access follows the meeting's recording permissions, and organizers with Teams Premium or Copilot can restrict who can access the recording and transcript. To keep your own copy, you can record the meeting with MeetGeek's desktop app, which records on your computer without adding a bot to the call, and keeps the recording and transcript in your own account. Let the other participants know before you start.




.avif)