How to Transcribe Zoom Meetings into Google Docs without Additional Permissions
Learn how to efficiently transcribe your Zoom meetings into Google Docs with these simple steps. Increase productivity and easily reference past discussions.

✅ Free meeting recording & transcription
💬 Automated sharing of insights to other tools.

Image Source: Freepik
Ever wondered what the secret to effortlessly transcribing Zoom meetings into Google Docs is? Imagine the convenience of having a perfect record of every word and idea discussed during virtual meetings.
Whether you're a student trying to capture every detail for notes or a professional in need of accurate meeting minutes, this step-by-step guide will surely come in handy. Get ready to unlock the power of automated transcription and conquer your Zoom meetings like a pro!
Benefits of Transcribing Zoom Meetings
Virtual meetings have become an integral part of our daily professional and personal lives. However, a key challenge of video conferencing is ensuring that information is captured accurately and effectively.
Here are the key benefits of transcribing Zoom meetings:
- Increased accessibility
- Improved searchability
- Easier sharing and collaboration
- Better note-taking
A. Increased Accessibility
Having the transcript of a meeting allows participants to easily follow the discussion to identify any points they missed. Additionally, it eliminates communication barriers and allows for a more inclusive and productive meeting experience.
This is particularly important for individuals with hearing impairments or language barriers.
B. Improved Searchability
Let’s face it: spending hours trying to recall specific details by revisiting an entire audio or video file is a waste of time.
Having a meeting transcript, on the other hand, allows you to quickly find and reference specific points, action items, or decisions made during said meeting. This enables participants to focus on the most relevant information and make more informed decisions in a shorter amount of time.
C. Easier Sharing and Collaboration
Transcribed Zoom meetings make sharing and collaboration a breeze, given how easy it is to share a text transcript with colleagues or team members.
Additionally, team members can review the meeting proceedings at their own pace and refer back to specific points as needed. This facilitates collaboration on meeting notes, as it enables individuals to add their thoughts and insights directly to the transcript.
D. Better Note-Taking
During a meeting, it is common for participants to jot down notes to capture key points, action items, or ideas. However, it can be challenging to keep up with the fast-paced nature of the discussion and accurately capture everything.
Transcribing the meeting eliminates the need for extensive note-taking, as participants can rely on the transcript for comprehensive and accurate information.
How to Transcribe a Zoom Meeting into Google Docs
There are two ways you can transcribe Zoom Meetings into Google Docs:
- Manually, with Zoom’s native transcription feature
- Automatically, with the help of a virtual meeting assistant
Method #1: Transcribing a Zoom Meeting Manually
Zoom’s built-in transcription feature enables you to download a text transcript of all audio captions and chats from a meeting.
IMPORTANT: This feature is not available on their free plan. You’ll need a Pro, Business, Education, or Enterprise subscription, as well as account owner or admin privileges to enjoy this feature.
Enabling the Zoom native transcription feature requires a few simple steps:
Step 1: Enable Cloud Recording
- Sign in to your account with your Zoom account credentials.
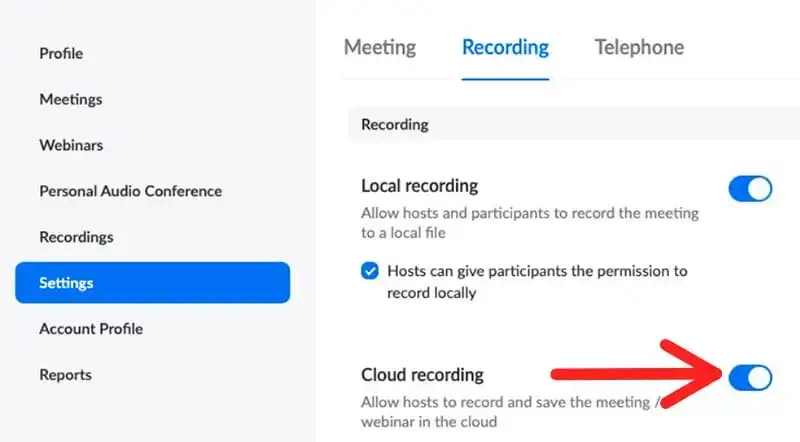
- Go to Account Settings and navigate to the Recording tab.
- Enable Cloud Recording and save the settings.
NOTE: You can only transcribe meetings that are stored in the Zoom Cloud, so you must have the Cloud recording setting enabled. The sessions that are saved on your personal device are not eligible for transcription.
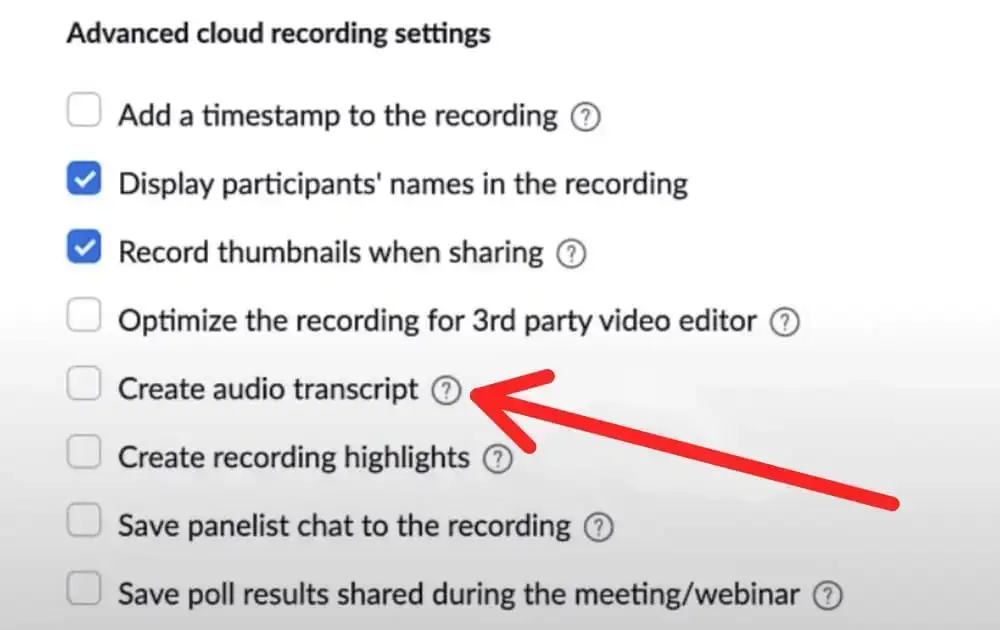
- Go to the Advanced Cloud recording settings, select the Create audio transcript box, and hit the Save button to confirm your selection.
Step 2: Download the Meeting Transcript
- In your Zoom account's menu, navigate to the Recordings section. This is where you'll find all of your recorded meetings.
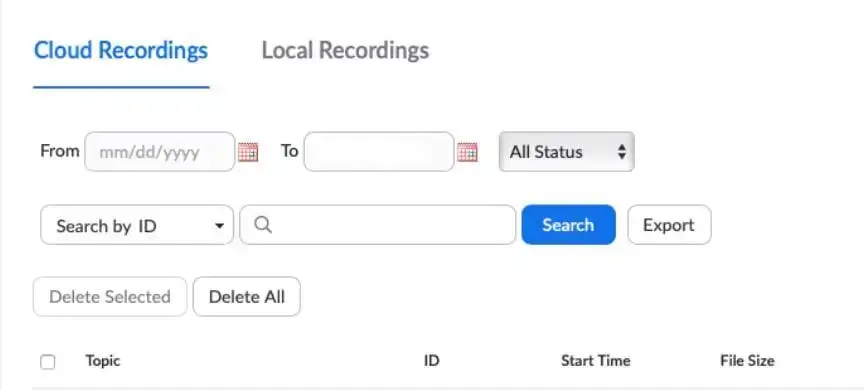
- As previously mentioned, the transcription feature only works for Zoom Cloud recordings. In the Cloud Recording section, select the specific meeting you want to transcribe by clicking on it.
- Within the Cloud recording, you can access the audio and video files, as well as the Closed Captions feature, which provides a full audio transcription of your meeting. Simply click on the download button to have it saved in the default VTT format.

That's it! All you have to do now is to convert the VTT Zoom meeting transcription into DOC with the help of an online converter, paste it into your Google document, and share it with your team as needed!
Method #2: Transcribing a Zoom Meeting Automatically with MeetGeek
If you're tired of Zoom’s limitations or simply want to transcribe your Zoom meetings more effectively, MeetGeek is the perfect solution! You can watch this quick explainer video on how to record and transcribe Zoom meetings with MeetGeek.
MeetGeek is not only a Zoom AI Notetaker, but your very own meeting automation platform that makes Zoom recording and transcribing effortless. On top of that, it offers a highly-customizable suite of features like summarizing, analyzing, and sharing meeting highlights with others.
Here’s what the process of transcribing your meetings with MeetGeek looks like!
Step 1: Create Your Account
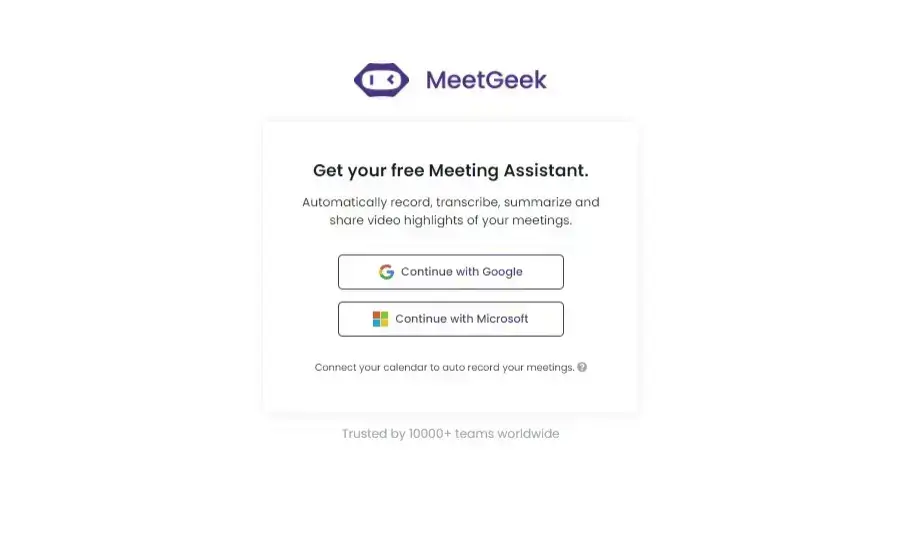
Create a free MeetGeek account in a matter of seconds by signing up with your Google or Microsoft account.
Step 2: Connect Your Google Drive & Calendar
From the Settings page, take a moment to connect your Google or Outlook Calendar (or both) account.
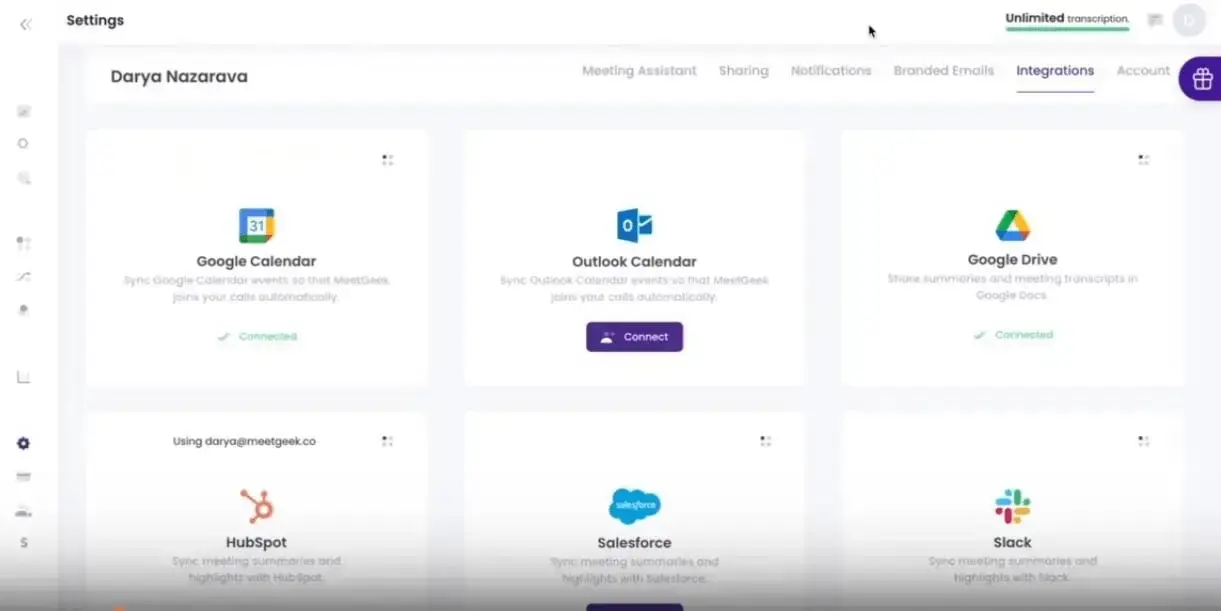
Then, proceed to sync your calendar with MeetGeek. Once you complete this step, the app will show all your scheduled and upcoming events in chronological order.
NOTE: You always have a say in which meetings you want to be recorded and transcribed by deselecting the ones you want MeetGeek to skip.
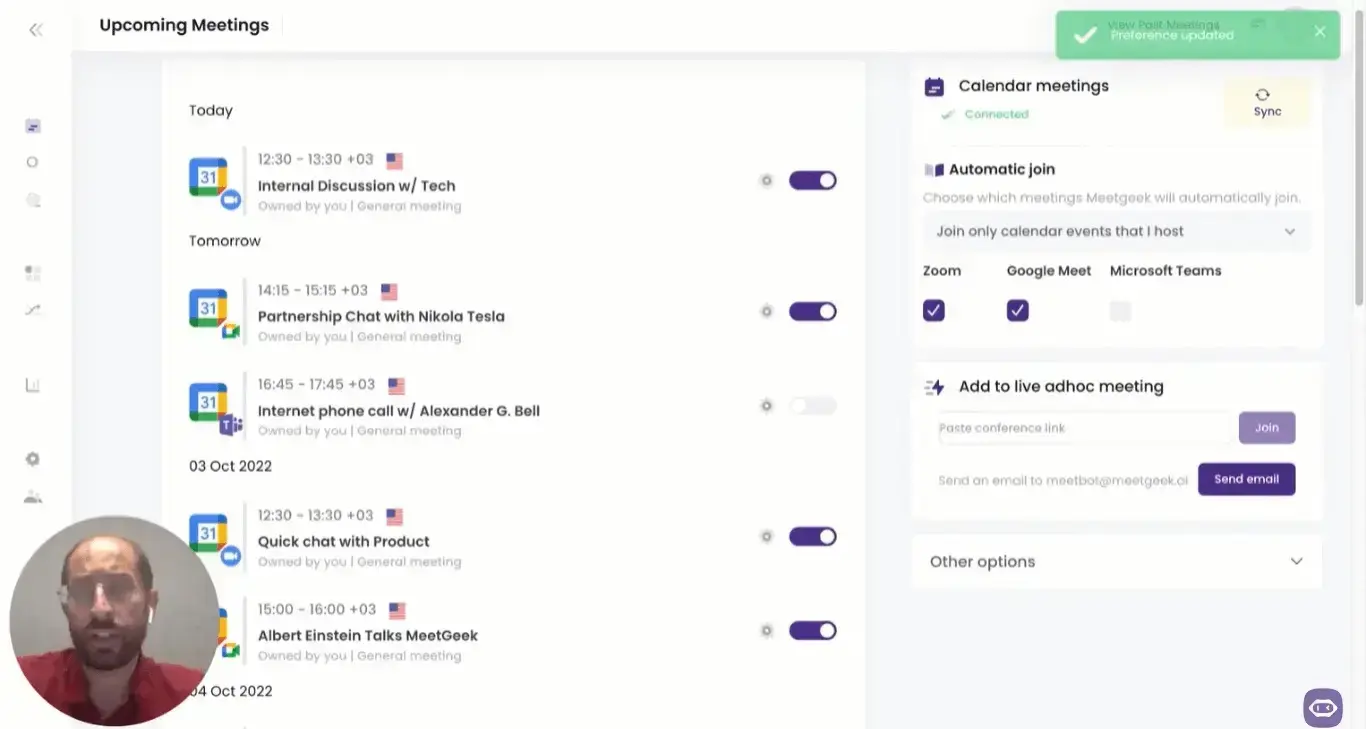
If your meeting is unplanned, you can paste the meeting link into the Add to live ad-hoc meeting bar, and you're good to go.
Step 3: Join Your Zoom Meeting
Once your meeting starts, the MeetGeek Assistant will join as a participant and begin recording. The meeting host will be informed immediately and can grant permission in only one click, which further simplifies the process.
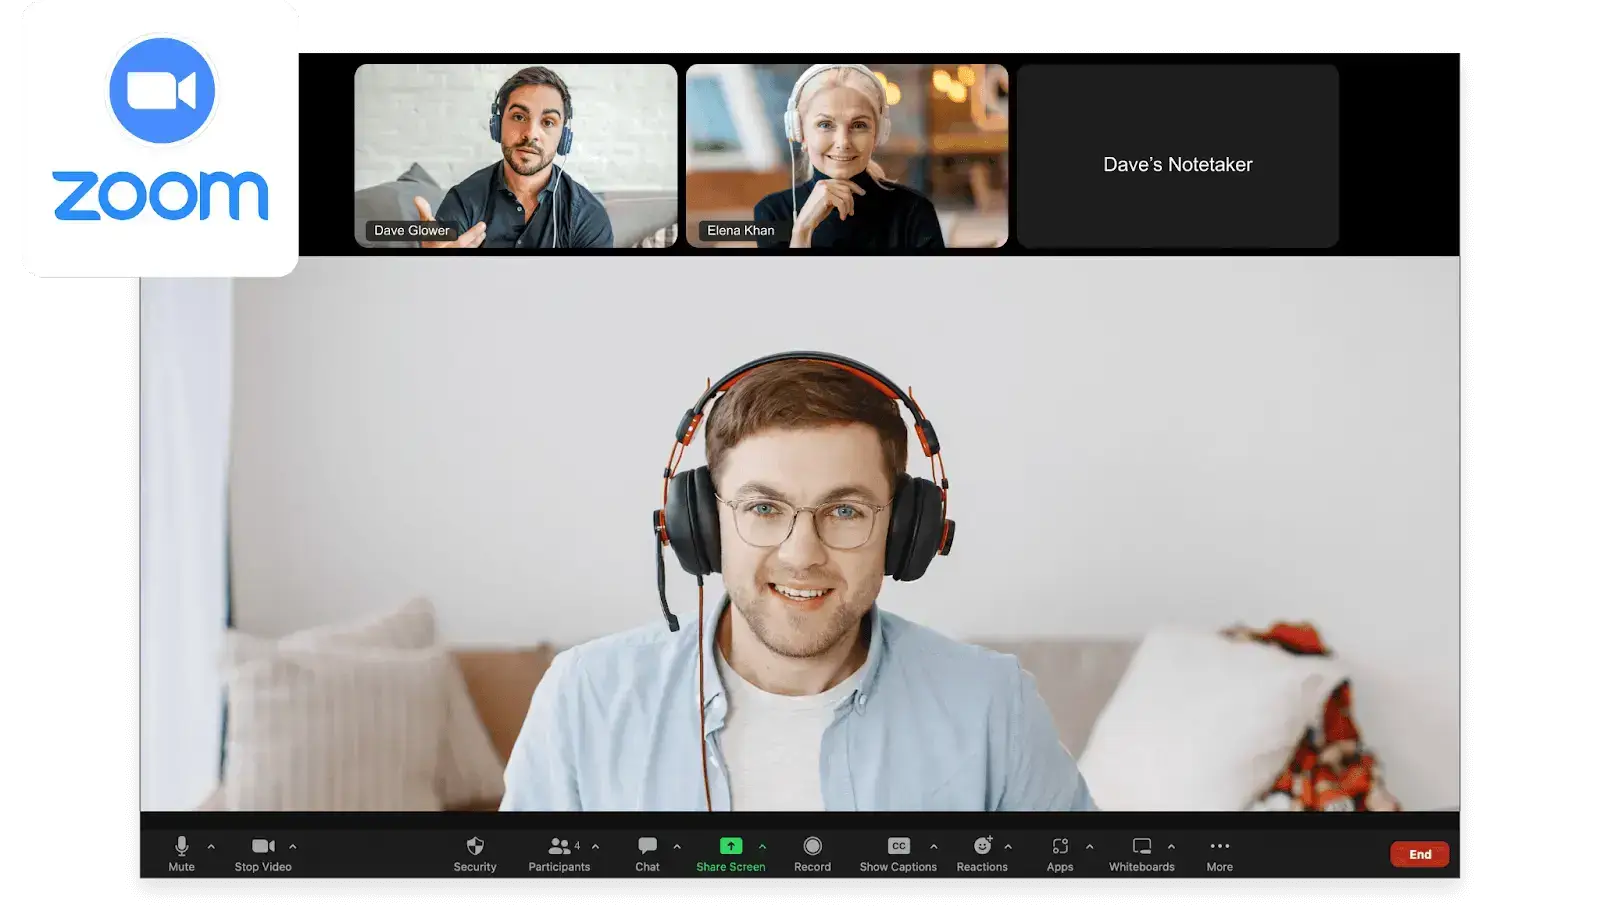
Afterward, you can concentrate on having productive conversations with your team, while the MeetGeek Assistant transcribes your Zoom meeting in the background.
BONUS: Even if you can’t attend a meeting, you can still have your MeetGeek virtual assistant join the conversation.
Step 4: Export Your Meeting to Google Drive
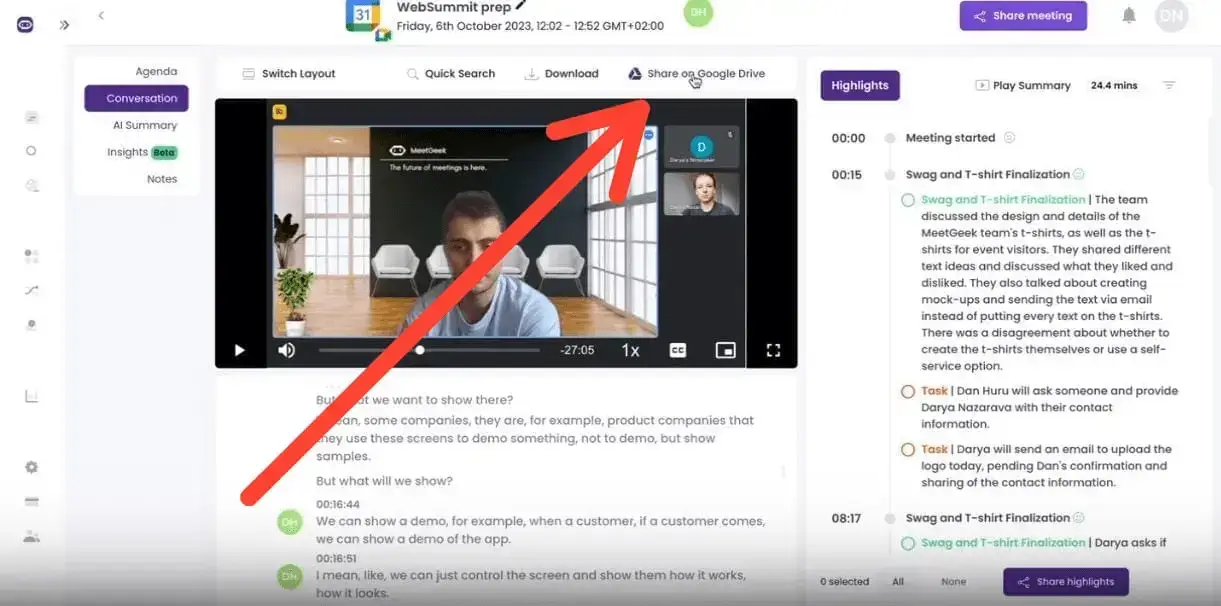
Once your meeting is over, simply go to your Past Meetings, find the recorded Zoom meeting you’re interested in, and click on View Meeting. Here, you have the video recording, meeting highlights, and transcript readily available.
Click on the Share on Google Drive button to export the transcript straight to your GDrive.
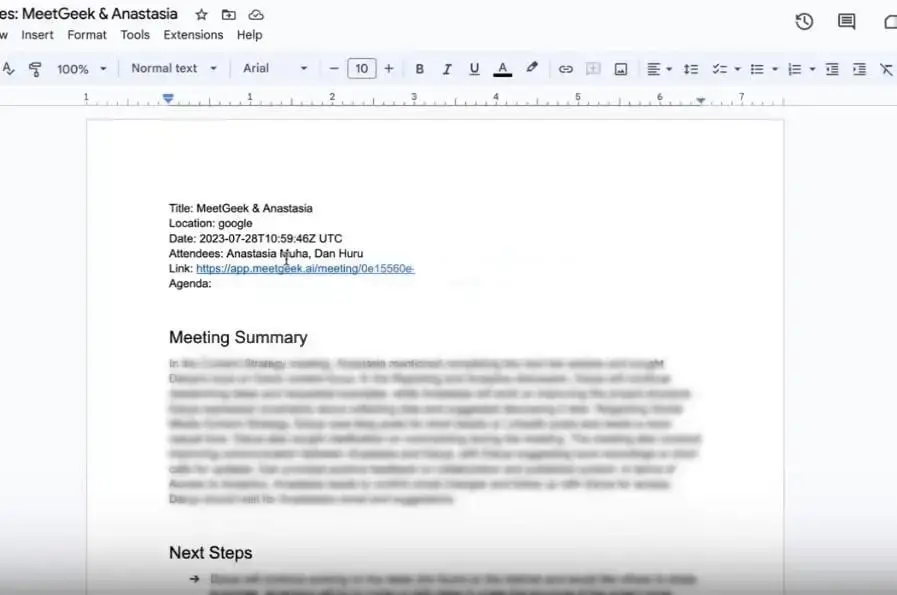
For each meeting, a separate document will be created. Here’s what each meeting transcript contains:
- Name of the meeting
- The platform where you hosted the meeting — Zoom, Microsoft Teams, or Google Meet
- Meeting date and time
- Attendees
- Link to the recorded meeting & transcript
- Meeting agenda
- AI-generated meeting summary
- Automatically-detected action items (next steps)
- The entire transcript
Alternatively, if you don’t want to export all your meeting transcripts separately, you can set up an Automated Workflow.
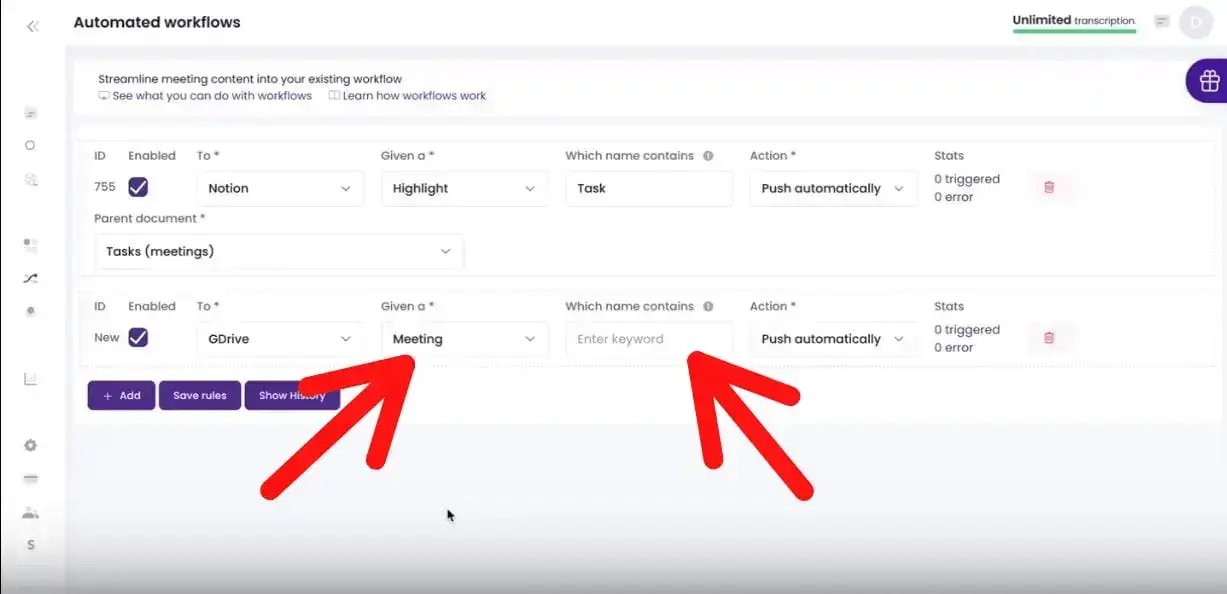
You can customize your workflow to export full transcripts, or just the highlights of your meetings. Additionally, you get to decide which transcripts get automatically exported into your Drive.
Let’s say you are an HR manager. If you only want your team’s interview transcripts added to Google Drive, enter ‘interview’ into the Which name contains tab, and MeetGeek will only export the meetings that contain the word ‘interview’ in their title.
Alternative Method: Auto-Sync Zoom Cloud Recordings with MeetGeek
If you’d prefer not to have the Notetaker join your meeting, an alternative way to automatically transcribe your Zoom meetings is through our Zapier integration.
This integration syncs your Zoom Cloud recordings directly to the MeetGeek account, ensuring you still receive accurate transcripts, meeting notes, and insights without MeetGeek actively recording the call. Instead, Zoom handles the recording natively.
Setting it up takes just a few minutes using our ready-to-use Zap template. To get started, follow these step-by-step instructions.
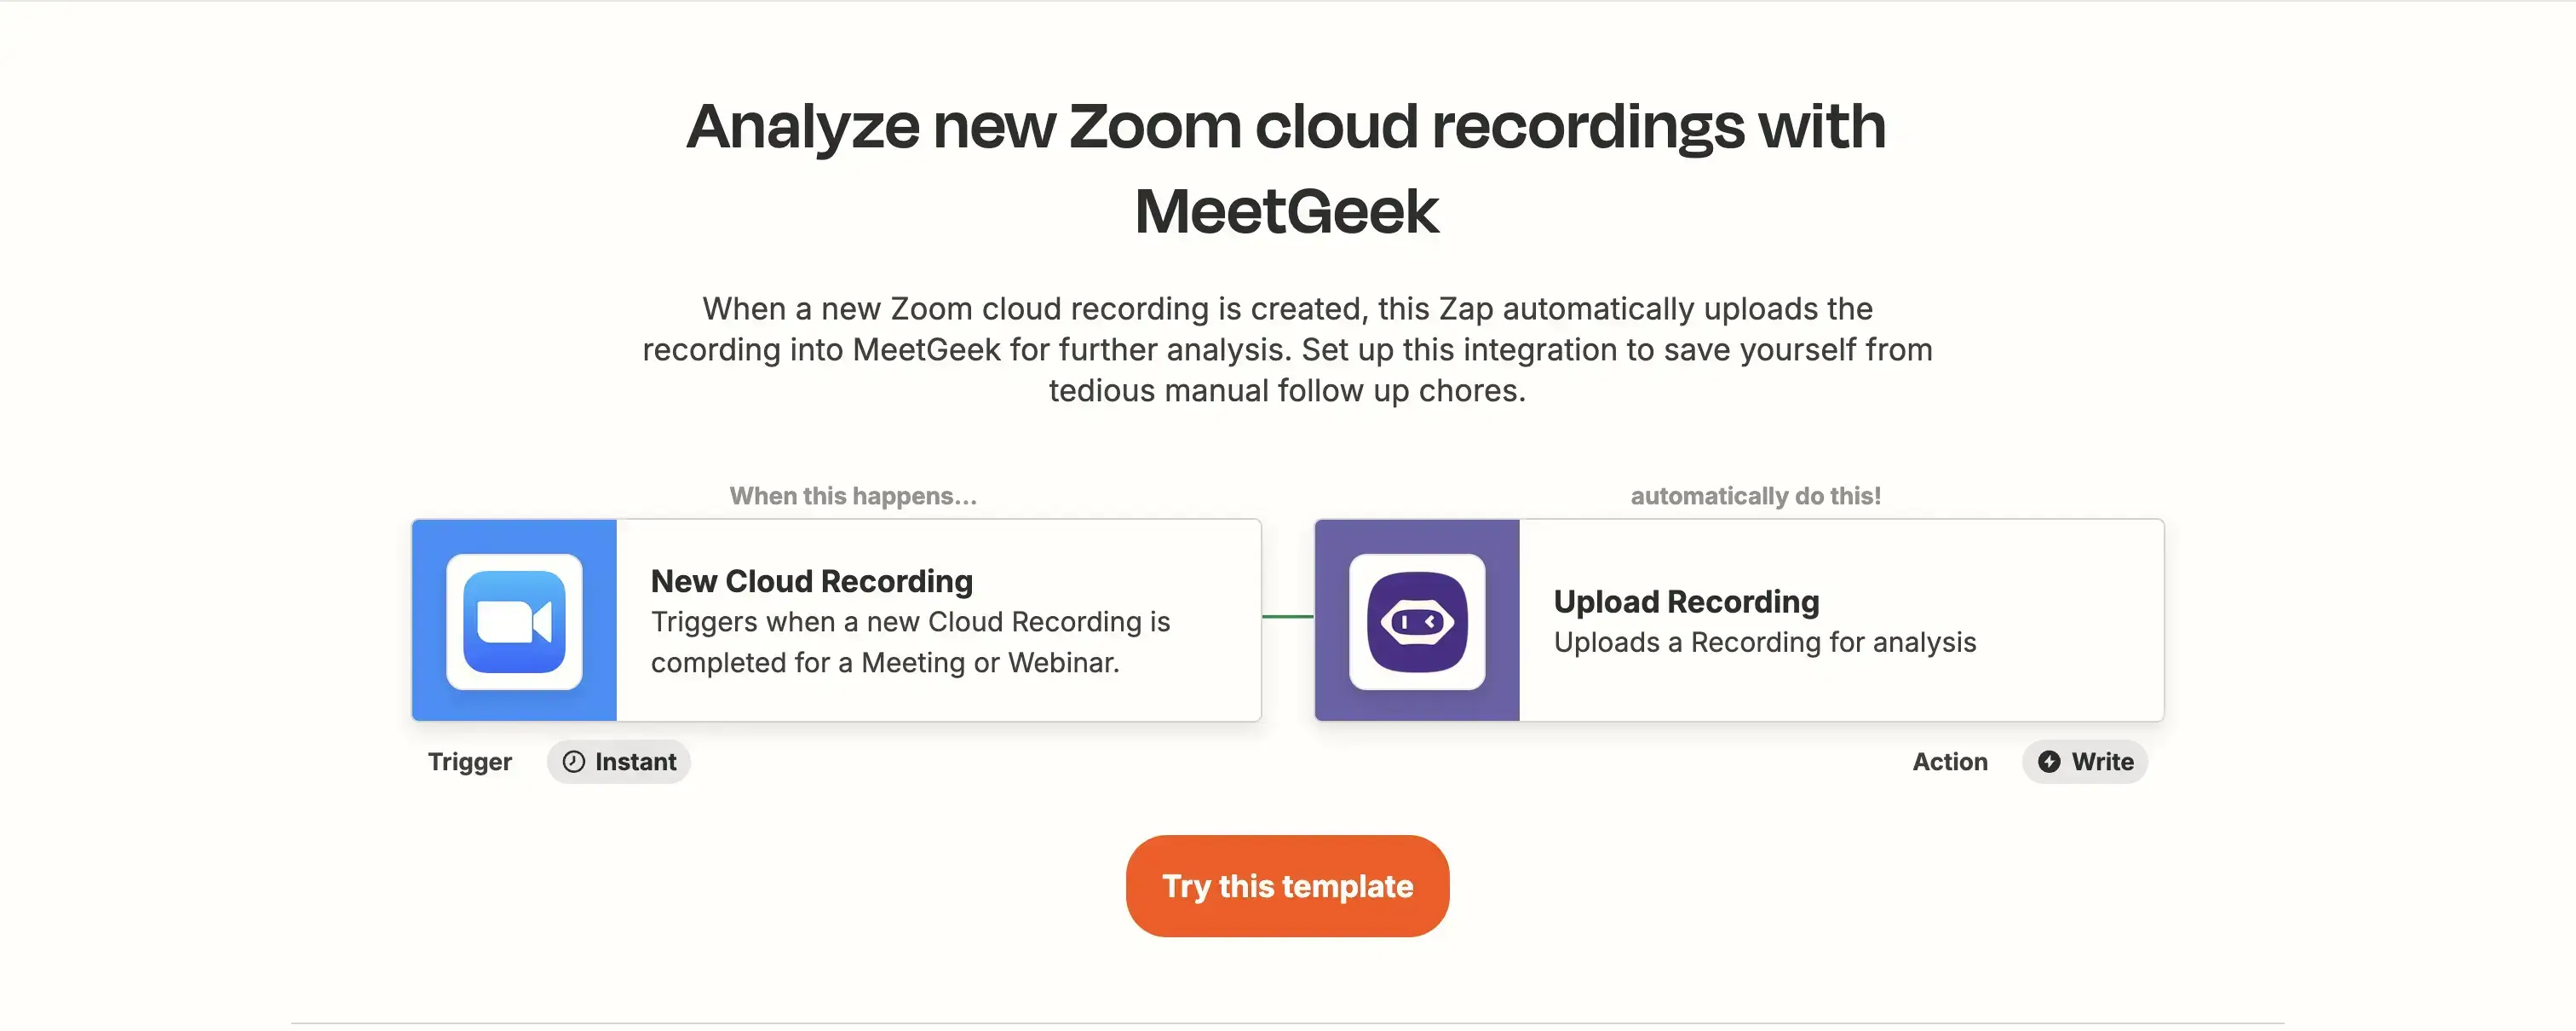
Once the automation is set up, your Zoom Cloud recordings will appear on MeetGeek’s Past Meetings page. From there, simply follow Step 4 from the method above to export the meetings to Google Drive.
Do More With MeetGeek
Now that you know how to transcribe Zoom meetings into Google Docs, it’s time to explore the added benefits of using MeetGeek!
Meeting Agenda
Having to constantly switch between your notepad, the meeting agenda, and the Zoom conference itself to keep your meeting on track can be quite the nightmare.
MeetGeek's Meeting Agenda feature simplifies the whole process by providing you with a user-friendly platform to create a well-structured and organized agenda for all types of meetings.
And that’s not all. If you don’t have enough time to create a meeting agenda from scratch, we also provide a library of templates for you to choose from. Whether you need a generic template or one that can be tailored to specific meeting requirements, MeetGeek has got you covered.

Meeting Highlights
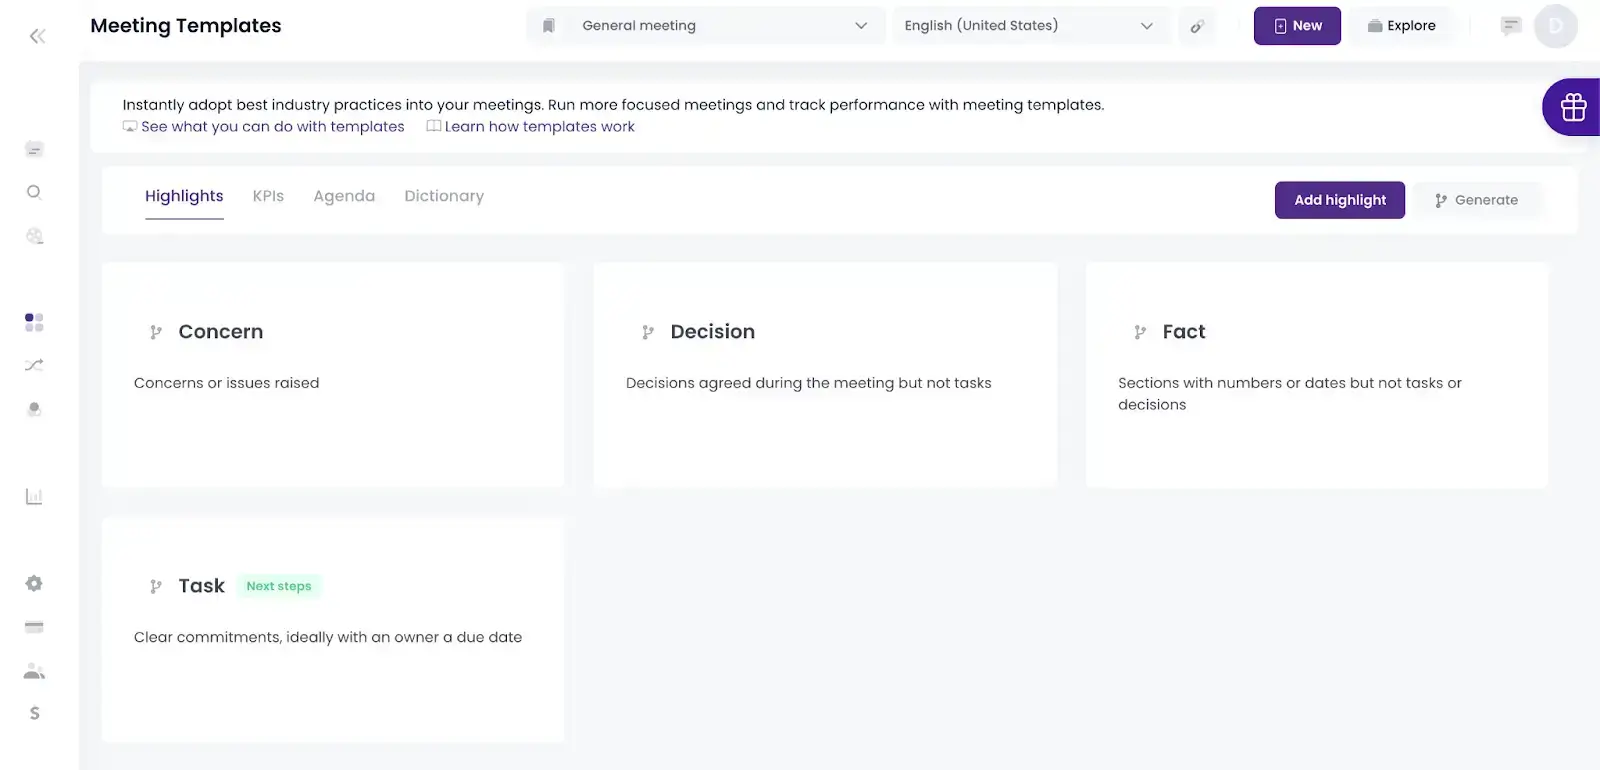
MeetGeek’s meeting highlights feature uses the keywords you provide to extract and highlight the most relevant parts of your Zoom meetings. This saves plenty of time when you’re looking for a specific segment of a meeting, since you don’t have to comb through the entire thing.
Repository of Conversations
With MeetGeek, you can easily dig into your past meetings and catch up on anything important that you might have overlooked. It's excellent for a quick refresher before your upcoming meeting, so you'll be completely ready and in the know.
Plus, you have the convenience of automatically sharing meeting recordings with your team members, whether they were present or not. This way, everyone can stay in the loop, avoiding any potential misunderstandings or conflicts.
Tips & Best Practices for Editing the Transcript
Regardless of how you choose to generate meeting transcripts, editing them is crucial for accuracy and clarity.
Follow these tips to enhance the quality of your transcript:
- Fix any errors in grammar, spelling, and punctuation: Ensure that your transcript is error-free, as this enhances its overall readability.
- Add speaker names and timestamps: Speaker identification allows for clear attribution, while timestamps help locate specific parts of the transcript quickly.
- Remove unnecessary filler words and phrases: Prune unnecessary filler words and phrases, such as "um," "uh," and repetitive expressions to make the transcript more concise and enjoyable to read.
- Organize the transcript into a logical format: Have each section or topic organized coherently to make it easier for readers to navigate and understand how the meeting actually went.
Transcribe Zoom Meetings into Google Docs with MeetGeek!
Virtual meetings are convenient, efficient, and allow us to connect with others from anywhere in the world. And while transcribing them has undeniable benefits, you must find a way to do so with as little effort as possible.
MeetGeek handles the tedious task of accurately documenting your meetings, adding meeting notes to Google Docs automatically, and giving you the freedom to actively engage in virtual conversations — while bypassing Zoom’s limitations. If you're ready to experience the countless advantages of having your own AI meeting automation platform, try MeetGeek for free!
.avif)















.png)
