


Learning how to screen record on Mac takes less than a minute. Apple includes a built-in screen recording tool that lets you record your entire screen, capture a selected window, add your microphone, and save a video file to your desktop for free.
For tutorials and quick walkthroughs, that setup works perfectly.
For recurring calls, client meetings, and internal syncs, saving raw video files to your computer creates long-term friction.
This guide walks through exactly how to record screen on a Mac, including audio and system sound considerations, and explains where a dedicated meeting recording system like MeetGeek fits in.
Method 1: How to screen record on Mac using the screenshot toolbar (Fastest way)
If you're on macOS Mojave (10.14) or later, this is the easiest solution.
Step 1: Open the screen recording toolbar
Press Shift + Command + 5. This keyboard command opens the Screenshot app toolbar at the bottom of your display.
You’ll see options to:
- Capture a screenshot
- Record entire screen
- Record selected portion
- Adjust recording options
Step 2: Choose what to record
You have three main screen recording options:
- Record Entire Screen – captures everything on your desktop
- Record Selected Window (on newer macOS versions)
- Record Selected Portion – drag your mouse to select a specific area

If you choose to record a selected portion, simply drag the borders to adjust the size.
Step 3: Adjust recording settings (Important)
Click Options in the toolbar before you hit the record button.
Here you can:
- Select a microphone (mic) to record your voice
- Show mouse clicks
- Set a timer (wait 5–10 seconds before recording starts)
- Choose where the file will be saved
- Adjust format and resolution (on supported Mac devices)
If you're recording a tutorial, YouTube walkthrough, or training, make sure the correct mic is selected before you start.
Step 4: Start recording
Click Record.
- If you selected the entire screen, click anywhere to begin.
- If you selected a portion, click Start Recording inside that selection.
Your Mac will begin recording your screen.
Step 5: Stop recording
To stop recording:
- Click the Stop Recording button in the menu bar
OR - Press Command + Control + Esc
After you stop recording, a floating thumbnail appears in the corner of your screen.
You can:
- Click it to edit immediately
- Or wait a few seconds for it to disappear and auto-save
Your video file will be saved to your chosen location.
How to record system sound on Mac
Here’s where things get tricky. By default, macOS can:
- Record your microphone
- Record your screen
But it does not record system audio (like YouTube sound, app audio, or internal system sound).
If you need to record system sound, you must:
- Download a virtual audio driver (like BlackHole or Loopback)
- Adjust system audio settings
- Route sound through that tool
This works, but it’s not simple.
If you're recording a Zoom call, webinar, or internal meeting and need system audio without a complicated setup, keep reading, as MeetGeek may be the better solution.
Method 2: How to record screen on Mac using QuickTime Player
You can also use QuickTime Player.
Step 1: Open QuickTime
- Open Finder
- Go to Applications
- Launch QuickTime Player
Or press Command + Space and search for it.
Step 2: Start a new screen recording
From the menu bar:
File → New Screen Recording
You’ll see a small recording window.
Click the arrow next to the record button to:
- Select your microphone
- Adjust volume
- Enable mouse click indicators
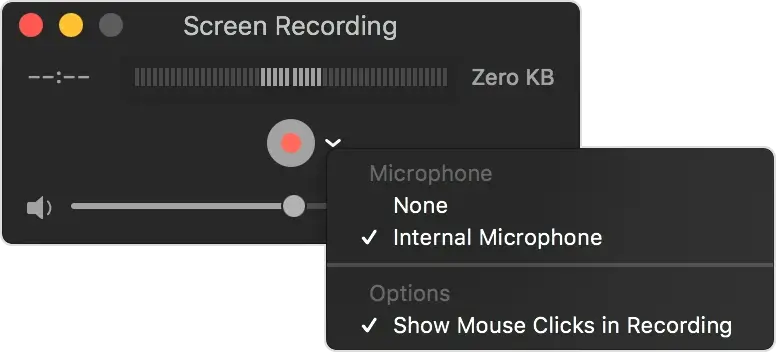
Then click Record.
Choose:
- Click anywhere to record entire screen
- Or drag to capture a selected area
Step 3: Stop & edit
Click the stop button in the menu bar.
QuickTime automatically opens the video file.
You can:
- Trim unwanted seconds
- Play it back
- Save or upload it
This is helpful for basic tutorial videos or quick internal documentation.
Method 3: Screen record with MeetGeek
If you are recording recurring meetings on your Mac, there is a point where pressing Shift + Command + 5 and saving another video file to your desktop stops being practical. Client calls, sales demos, training sessions, weekly sync meetings, and webinars require more than screen capture. They require structure, searchability, and follow-through.
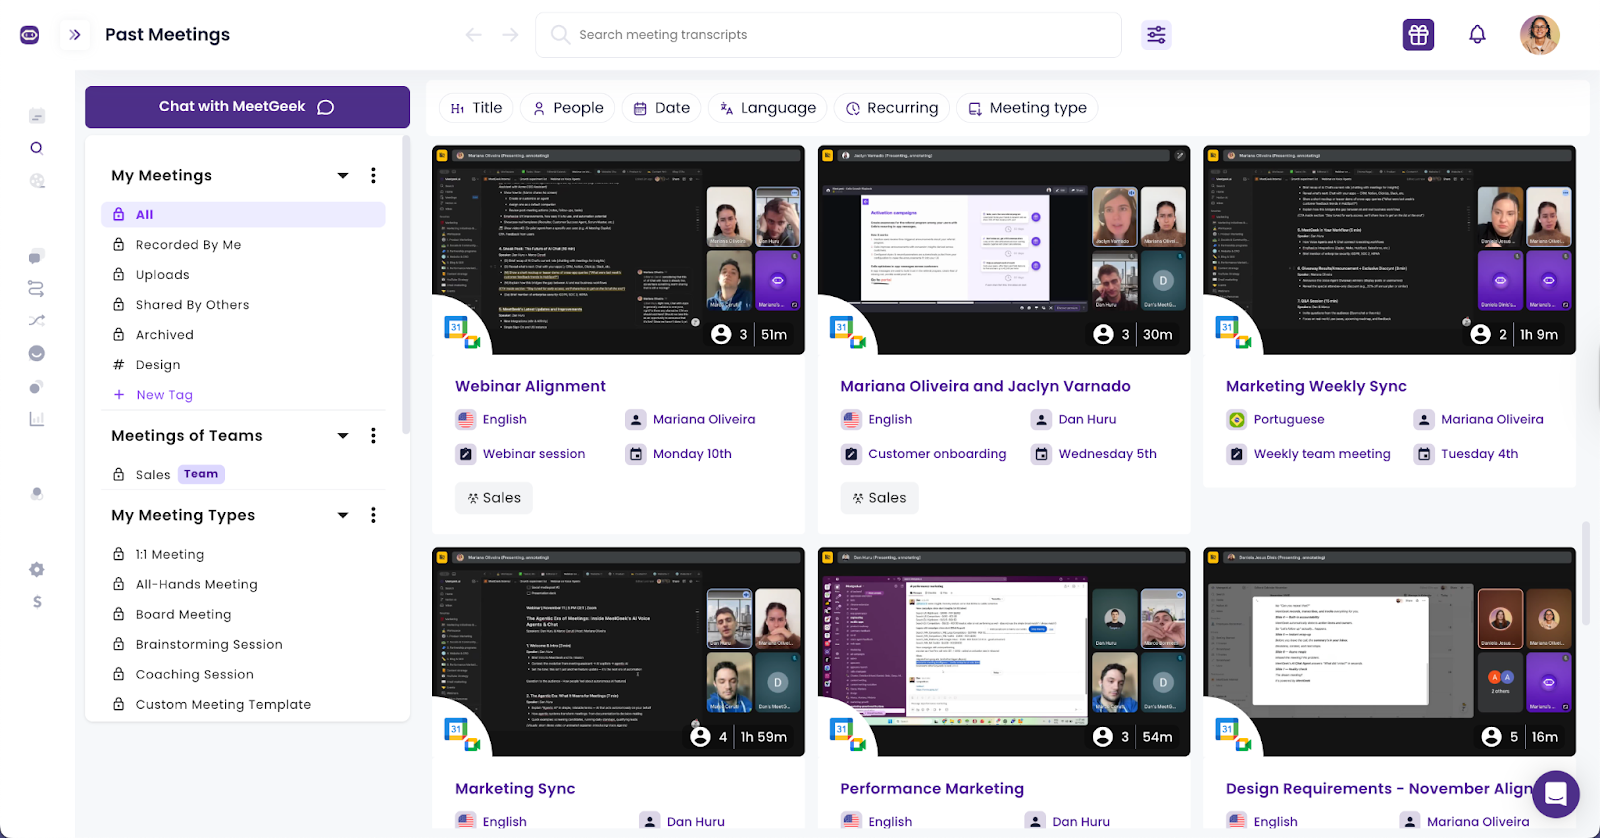
MeetGeek replaces manual screen recording with automated meeting capture and post-meeting intelligence.
Step 1: Connect MeetGeek to your meeting platform
- Sign in to your MeetGeek account.
- Connect your Zoom, Google Meet, or Microsoft Teams account.
- Choose your recording preferences in settings.
Once connected, MeetGeek can automatically join scheduled meetings or be invited like a participant. You do not need to press record on your Mac, open QuickTime, or configure system audio routing.
If you want to record without a bot or expand your recording to other platforms such as Discord or Webex, you can also add the MeetGeek Chrome extension to record your meetings.
Step 2: Let MeetGeek record the meeting
At the scheduled time, MeetGeek joins the call and handles:
- Video recording of the session.
- Clear audio capture without relying on your Mac microphone settings.
- Secure cloud storage of the recording.
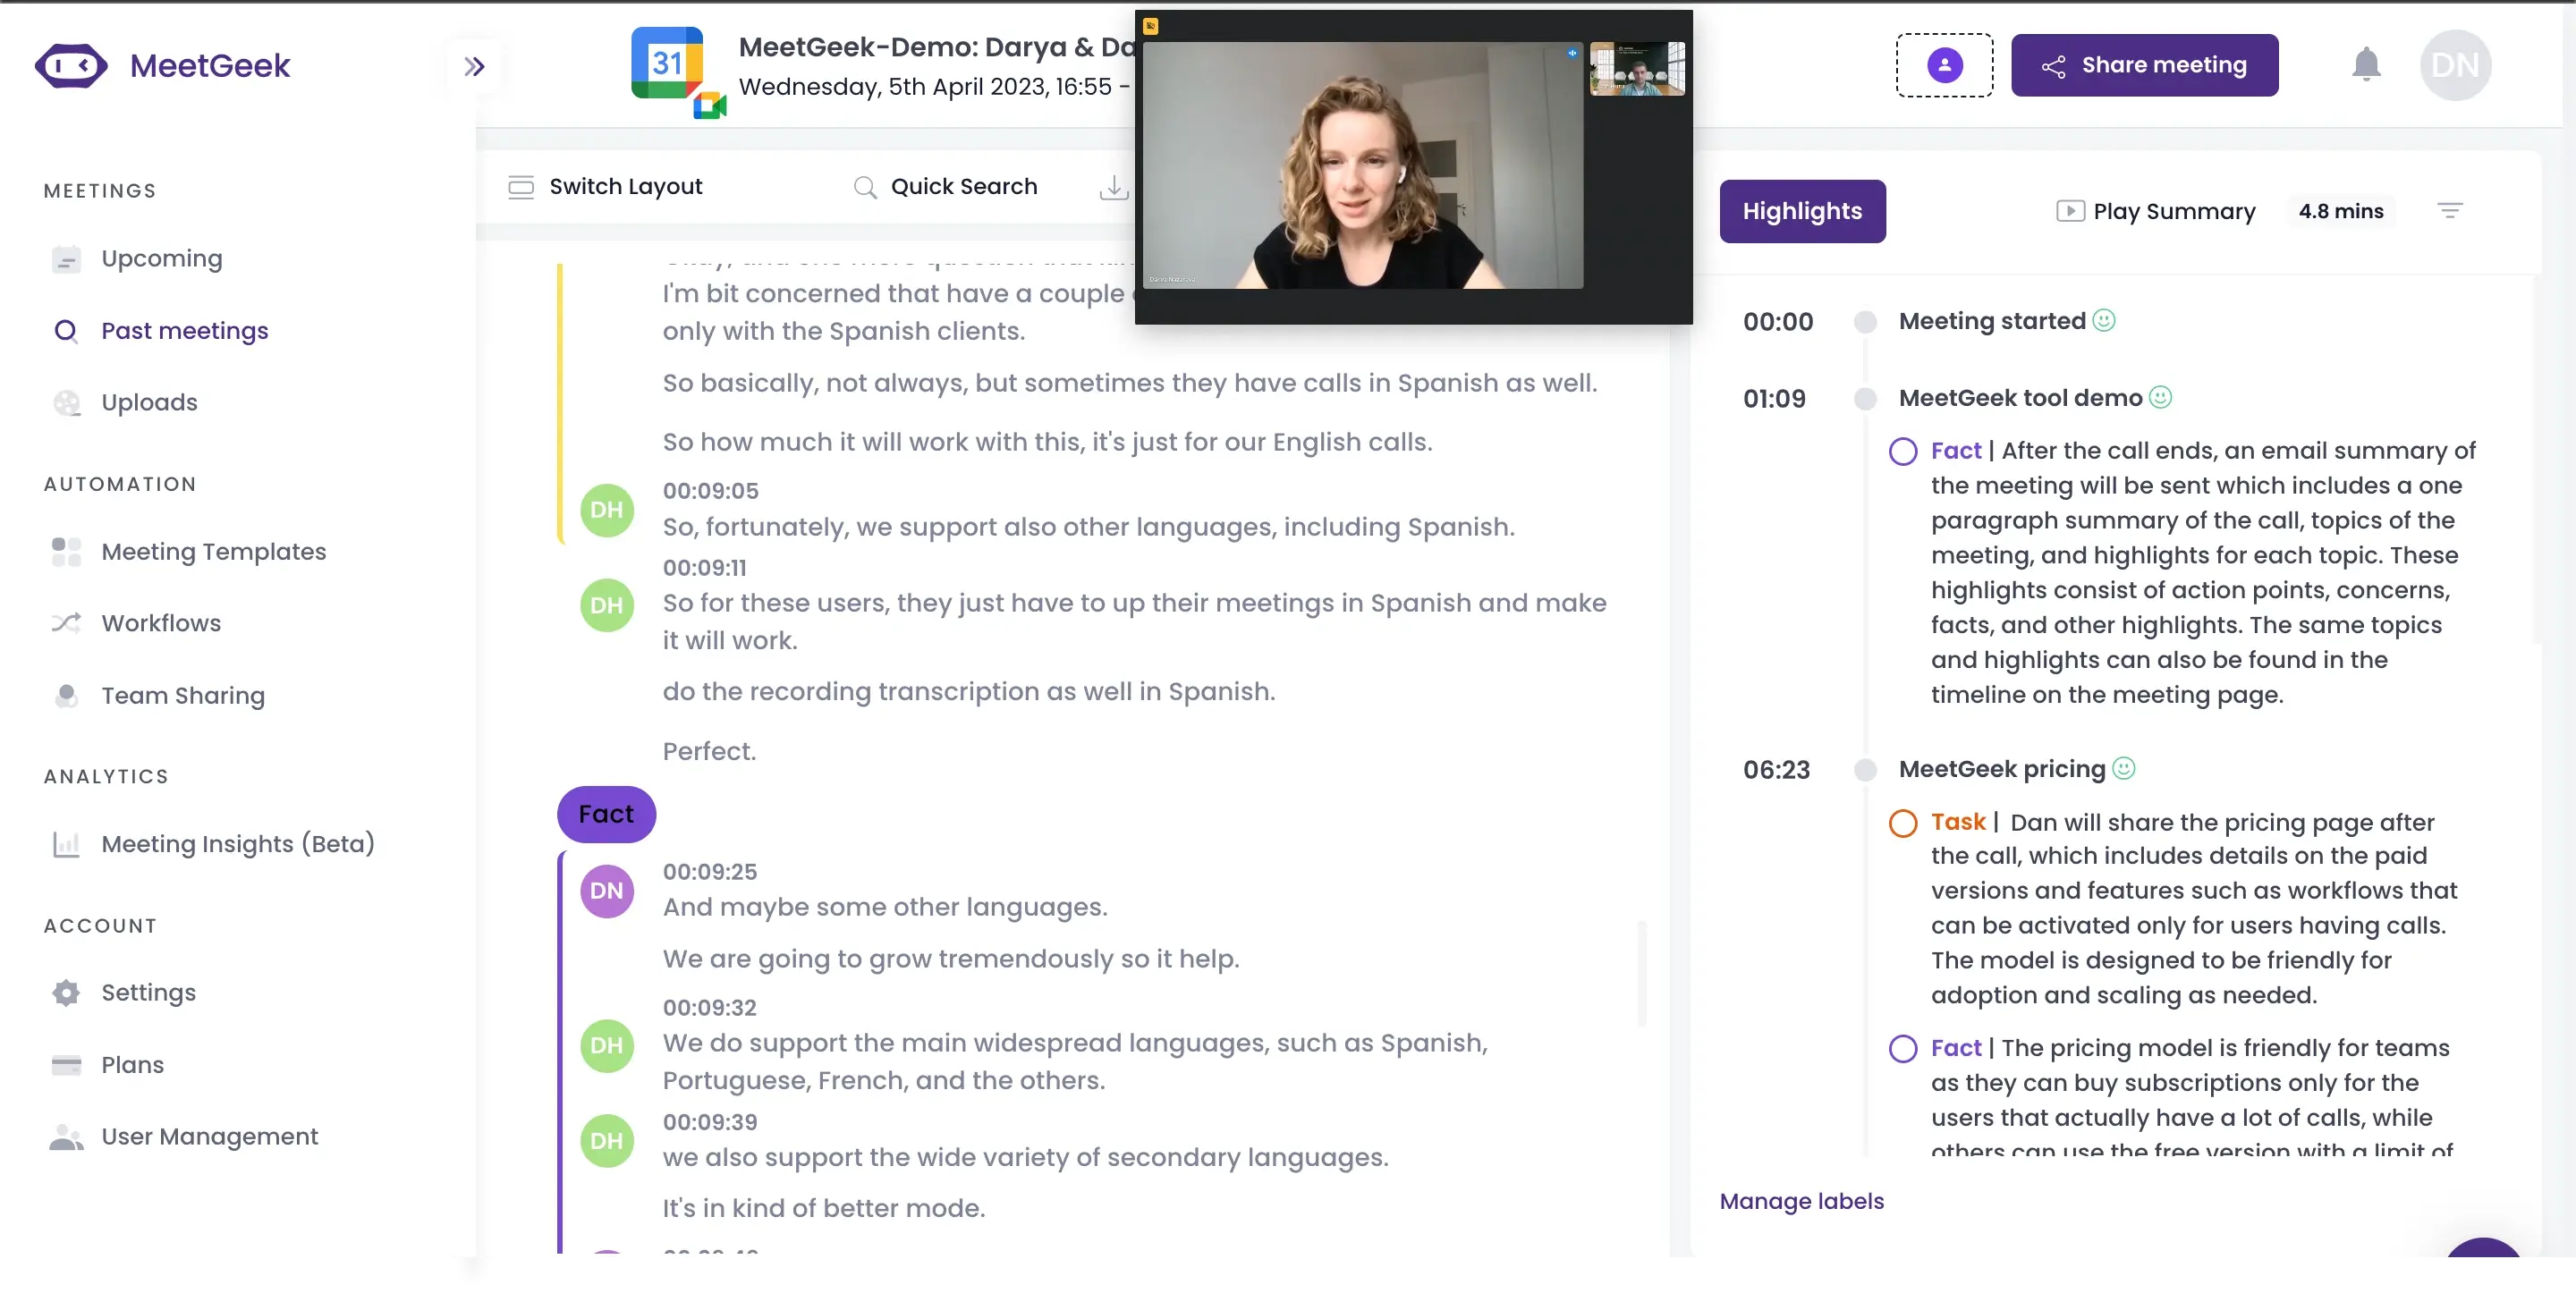
You do not have to manage screen areas, select the entire screen, or adjust capture resolution. The meeting is recorded directly within the platform environment rather than through your desktop display.
Step 3: Access the transcript and AI summary
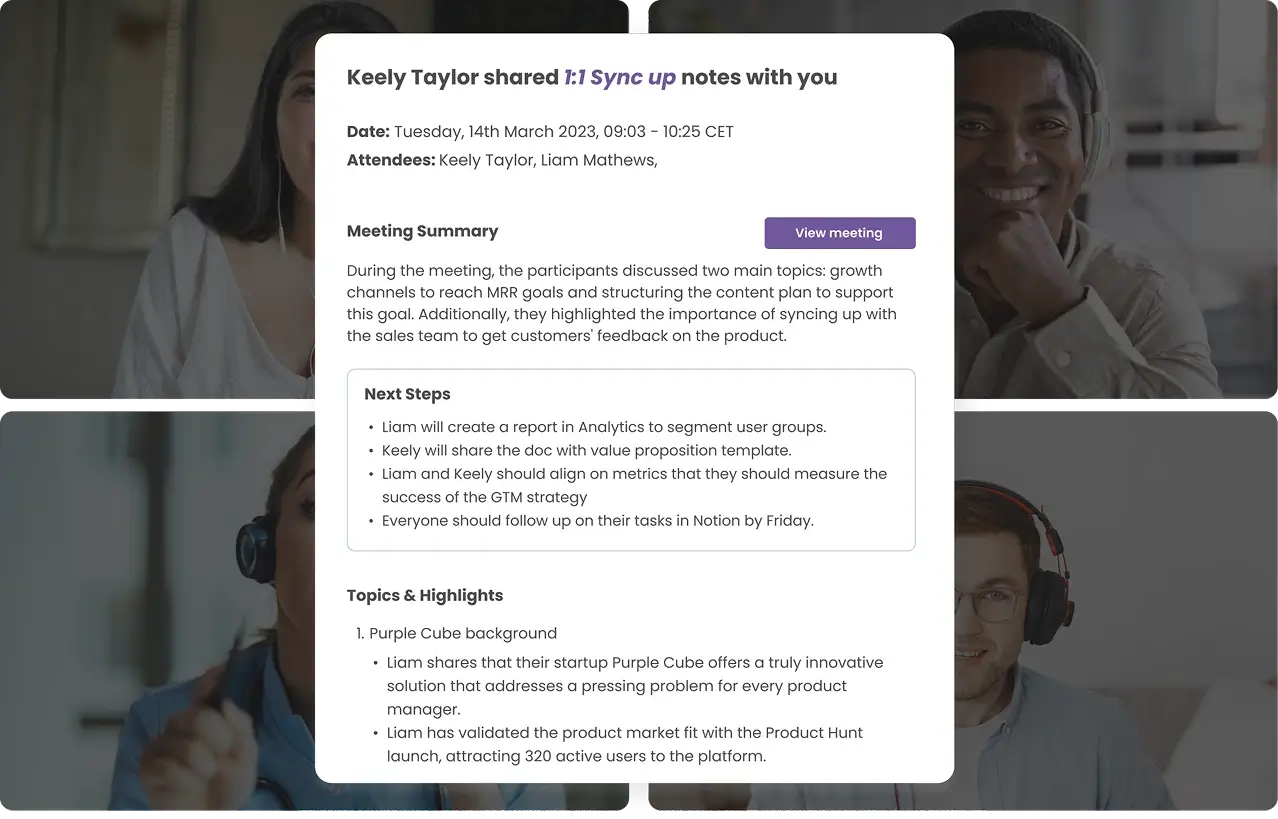
After the meeting ends, MeetGeek automatically generates:
- A full transcript.
- A structured AI summary.
- Key discussion points.
- Identified action items.
Instead of rewatching a full video to find one detail, you can search the transcript by keyword and jump to the exact moment in the recording.
This changes how teams use meeting recordings. The value shifts from “we have the file” to “we can instantly find what was said.”
Step 4: Share, organize, and integrate
MeetGeek stores meetings in a centralized workspace. From there, you can:
- Share a secure link with teammates or clients.
- Copy summaries into documentation.
- Filter meetings by participant or topic.
- Integrate with other tools to sync notes and action items.
Rather than downloading a file, renaming it, uploading it elsewhere, and manually writing follow-up notes, the system keeps everything connected.
What you can do beyond recording with MeetGeek
Manual screen recording produces a video. MeetGeek turns each meeting into a structured asset that remains useful long after the call ends.
Search across conversations
You can search across multiple meetings for a specific term, feature request, or client name. This is not possible with isolated desktop files unless someone manually transcribes them.
Track decisions and action items
MeetGeek highlights tasks and commitments so they are not buried inside a long video recording. Weekly sync meetings and client calls become easier to follow up on because responsibilities are visible.
Revisit specific moments with chapters
Instead of dragging a timeline back and forth, you can jump directly to sections of interest. For training sessions and webinars, this allows teammates to review only the relevant parts.
Build a long-term meeting library
Over time, recordings accumulate. With manual screen capture, that accumulation becomes clutter. With MeetGeek, meetings form a searchable archive that supports onboarding, performance reviews, customer research, and strategic planning.
Pro tips for better screen recording on Mac
The built-in screen recording tool on Mac is simple, but small adjustments make a noticeable difference in video and audio quality. A few practical habits prevent common issues and reduce editing time later.
Check your mic before you start
Before you press record, open the Options menu in the screenshot toolbar and confirm the correct microphone is selected. Many recording issues happen because the wrong mic is active or the input levels are too low. If possible, test for a few seconds and play it back to verify your voice sounds clear and balanced.
Clean your desktop
Close unnecessary windows and remove visual clutter from your screen. Notifications, background tabs, and messy desktop icons distract viewers and reduce clarity. If you are recording a tutorial or demo, keep only the window or app you need visible on your display.
Adjust resolution intentionally
Higher resolution creates sharper video, which is helpful for detailed tutorials and UI walkthroughs. It also increases file size. If you plan to upload to YouTube or share externally, a higher resolution can improve clarity. For internal sharing, moderate resolution keeps files lighter and easier to store.
Use headphones during recording
If you are capturing audio from a Zoom call or another app, headphones reduce echo and feedback. They also prevent your microphone from picking up system sound from your computer speakers, which improves overall sound quality.
Trim immediately after recording
As soon as you stop recording, review the video and trim unnecessary seconds from the beginning or end. QuickTime makes this simple, and trimming right away prevents unused footage from accumulating across multiple files. A cleaner final video saves time for anyone who watches it later.
Where your screen recordings are saved
By default, files are saved to your desktop.
To change the save location:
- Press Shift + Command + 5
- Click Options
- Select a new location
You can choose:
- Desktop
- Documents
- Other folder
How to take a screenshot instead
If you don’t need video, just a screen capture:
- Press Command + Shift + 4
- Drag to select area
- Release mouse
For full-screen screenshot:
- Press Command + Shift + 3
Final thoughts
Learning how to screen record on Mac gives you a fast, built-in way to capture video on your computer. However, the limitation appears after you stop recording. A saved video file does not organize itself, summarize decisions, or track action items. When meetings become frequent and outcomes matter, storing raw recordings on a desktop creates friction that compounds over time.
MeetGeek addresses that gap by turning recorded meetings into structured, searchable assets with transcripts, AI summaries, chapters, and clear follow-ups. Instead of managing files, you manage insights.
If your team relies on Zoom, Google Meet, or Microsoft Teams and needs more than basic screen recording, try MeetGeek for free and see how automated meeting capture and AI-powered summaries change the way you document conversations.
Frequently asked questions
How do I screen record on a Mac with audio?
To screen record on a Mac with audio, press Shift + Command + 5 to open the screenshot toolbar. Choose Record Entire Screen or Record Selected Portion, then click Options and select a microphone under the audio section. Press the Record button to start and use Command + Control + Esc to stop recording.
This method records your screen and microphone input. Recording internal system audio requires additional configuration or third-party tools.
Can a Mac screen recording capture system audio?
By default, macOS screen recording captures microphone input but does not directly record internal system audio, such as app sound or YouTube playback. Capturing system audio requires additional audio routing software and changes in system settings.
For meetings on Zoom, Google Meet, or Microsoft Teams, using a dedicated meeting recording tool like MeetGeek avoids complex setup and ensures clean audio capture without manual system sound configuration.
What is the best way to record Zoom meetings on a Mac?
The best way to record Zoom meetings on a Mac depends on your goal. For a simple video file, you can use Zoom’s built-in recording feature or the macOS screen recording tool.
For teams that need transcripts, searchable notes, AI summaries, and organized storage, a meeting assistant like MeetGeek provides automatic recording, structured summaries, action item tracking, and centralized access to past conversations.




.avif)